A fun and fascinating salt, glue and watercolour experiment that helps teach preschoolers how to spell their name!
This was our first time doing salt, glue and watercolour art, and the hooligans and I had so much fun with the process! This is a terrific art technique for toddlers and preschoolers to learn letter and name recognition while getting creative, but it can be used as a simple science activity as well.
If you’re looking for an activity that’s fun, engaging, and that covers a lot of educational ground, this one is great. The supply list is really basic too, so you can pull it all together in minutes using items you have around the house.

Skill-building and learning:
This activity is jam-packed with teaching and learning opportunities!
- Science: absorption
- Art: colour recognition and colour blending
- Fine motor: squeezing pipettes and droppers
- Co-ordination: pouring salt, shaking tray
- Concentration: applying colour to a specific area on the paper
- Literacy: letter recognition and formation, name recognition
Easy set-up with common, house-hold materials:
Supplies needed for salt, glue and watercolour art:

For your convenience I’ve included Amazon affiliate links.
- white glue

- liquid watercolours (or Food Color and water)
- ice cube tray
- pencil
- table salt
- Pipettes /droppers (or a paint brush)
- card stock or thin cardboard
- A tray or baking pan
Salt, glue and watercolour experiment – the process:
I started by printing each child’s name on a piece of white card stock. Then I gathered the children around, and they identified their own names, and watched as I traced all of the letters with white glue.
Describe the formation of each letter while you’re tracing:
Our glue bottles are really hard to squeeze so it took quite a while to trace the letters. That was great because the kids were mesmerized by the tracing process, and I could really draw their attention to how each letter was formed. As I traced, I would announce the letter, and also describe the way we form the letter when we’re printing it: “A – dowwwwn, dowwwwn and acroooooss”, or “N – dowwwwn, and uuuuup and ooooover”. That looks silly when I write it out, but by drawing out my speech, and tracing the letters very slowly, we were able to give each letter a good amount of attention.
Once I’d traced their names, I turned the activity over to the hooligans. They started by placing their name card in a baking pan. The pan contains any mess, and makes it easy to save any leftover salt for a future project.
I slightly opened the tab on the salt (so the flow would be reduced), and the kids took turns covering their white glue entirely with salt.

Then they shook the tray back and forth a few times to make sure all of the glue was well coated. Tip your tracing sideways and tap away any loose salt.
And now for the real fun – using liquid watercolours or food colouring:
I presented the hooligans with a handful of pipettes and medicine droppers, and an ice cube tray filled with coloured water. Some sections had liquid watercolours in them, and in other sections, I’d mixed a drop or two of food colouring with a few drops of water.

They dripped the food colouring on to their salt tracings, and WOW! Well, I’m not going to go into detail here, because the photos speak for themselves, AND, I want you to experience the same wow-factor with your own kids. 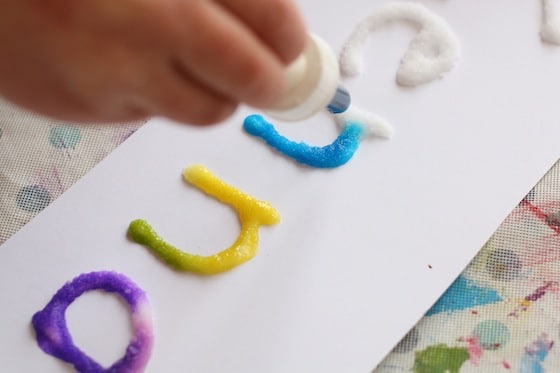
You don’t have to do a name project on white paper like we did. Let your imagination guide you!
Second time ’round we simply got creative on black card stock, and the results were equally thrilling!

It should be noted that you won’t be able to display your art upright as the salt will crumble and fall away from the paper.
For an art-science activity with permanent results that you can keep and display, try our 3 ingredient puffy paint! It’s fantastic!
More easy art techniques for Kids:
Paper Towel Art
Starry Night with Melted Crayons
Follow the Hooligans on Facebook

Jackie is a mom, wife, home daycare provider, and the creative spirit behind Happy Hooligans. She specializes in kids’ crafts and activities, easy recipes, and parenting. She began blogging in 2011, and today, Happy Hooligans inspires more than 2 million parents, caregivers and Early Years Professionals all over the globe.


triciaslittleblessings
I did this with my little buddies today. I think we will be doing this again . My little three year old buddy had really good control .This was our first time doing it as well. I love your pictures .
amber whitehead
we’ve done our names in salt before you guys made it look so fun we’re definitely going to have to do this again.
Michelle Gibson
Oooooooh! The sneak peak had me curious! Fabulous! Worth the wait for sure!
Katie @ Preschool Inspirations
This is so awesome, Jackie!!! I can’t wait to try it out :).
kewkew
What a wonderfully fun idea!
Bridget
brilliant idea, going to try this next week with my mindees (need to think of a cute name for them…Groovy Gang!) thank you for what you do…and keep warm over there.
Jennifer
Bobbins! You can call your mindees bobbins. Like for sewing.
JDaniel4's Mom
What fun! Kids will love creating letters this way!
Stephanie
Great ideas and love your page! Will be trying this one next week with my gang!
Thanks for the art inspiration 🙂
Kelly
I love this idea! It is going to be raining all day tomorrow, so I think we will be doing this.
Thanks for sharing,
Kelly
Jamie
Wow! I had no idea the salt would absorb the color like that. Fantastic! Thanks for sharing.
Jamie
Play to Learn Preschool
Josephine
Hi Jackie!
I just tried this out (I’m planning to use this to make a rainbow colored birthday sign for my girl) but my glue seems to spread out rather than stay nicely in shape like yours. And it gets worse after I drop the coloring on. Would you know why and how to solve this?
I love your ideas, by the way!
happyhooligans
It sounds like it must be the consistency of your glue, Josephine. My glue stayed put when I drizzled it onto the paper, so if yours is running, it might be too thin. Perhaps a different brand would work? I should mention though that even if another glue worked, this isn’t a project that you can really display other than laying it flat. The salt crumbles and falls off. It’s more just a fun experiment/activity to try, but not a piece of art that’s really functional.
Heather
Hi! I just saw this, as you posted it today! You said that the salt crumbles… Do you think that it would stay put if you sprayed a few coats of Modge Podge sealer over it? Or something similar?
happyhooligans
It might, Heather. I really don’t know. You could try it. 🙂
Capri + 3--Theresa
I love your project idea. Our little ones would love it as they are learning their letters and love art. Thank you for sharing on Artsy Play Wednesday. I always look forward to reading your posts. You have so many creative ideas.
Eva Lewis (The Mulititasking Mummy)
That’s a pretty cool activity, pinned! Thanks for linking up to Mummy Mondays.
Mary Catherine
Love, love, love! Art AND literacy = YES, PLEASE! We’ll be trying this out in preschool sometime in the next month. I’m featuring this at Share It Saturday this weekend.
Jill
I like that this project can be completed with items that anyone will have around the house At first I thought “Oh what a mess!” But you are one step ahead of me with the baking pan.
Thank you for stopping by the Thoughtful Spot Weekly Blog Hop this week. We hope to see you drop by our neck of the woods next week!
Victoria
Love, Love this!! I’m definitely going to do this with my girls next week! I know they are going to love it 🙂 Thanks for sharing at the Thoughtful Spot Weekly Blog Hop! You were featured as one of my favorites this week :0)
JayNine
excellent for name/letter recognition! I know my 4 year old will love this too as she will demand trying the glue tracing herself! thank you ;D
Mars M.
Hi, Jackie! I’m so thrilled to have found your site! And this activity–I must try this soon! Thank you!
Mars M.
http://www.montessoriinmars.blogspot.com
mrs mayank sharma
thanks aiot for inovative ideas. i did salt activity with my students they loved it.
Mini
This is so great:))))
Tara
My nursery children loved this but the watercolour kept rolling off and made an almighty mess..how do you get it so it just goes on the salt and absorbs in like the pic?
happyhooligans
I’m not really sure what to suggest, Tara. Any time we’ve done it the salt just absorbs the watercolours. Maybe the children are squeezing to much liquid for the salt to absorb? Just try a drop or two at a time?
Phyllis
I love this idea for name recognition. I have 20 children in my class. Any way to suggest how to do this activity easily with a large class? Do the Letters need to be dry in order them to absorb the watercolors?
happyhooligans
The glue and salt doesn’t have to dry first, Phyllis. Go right ahead and add the watercolours after covering the glue with salt.
gazi haber
The glue and salt doesn't have to dry first, Phyllis. Go right ahead and add the watercolours after covering the glue with salt..
Marcia Beckett
Thanks for sharing. I used this technique with my third graders! Check out what we did. http://www.artisbasic.com/2014/10/salt-watercolor-fall-leaves.html
happyhooligans
Oh wow! They’re gorgeous, Marcia! What a great fall project! Thanks for sharing. 🙂
Linda Miller
How do I unsubscribe ? I have no children in my home. Your ads are taking up all of my Facebook
Thank you,
Linda A Miller
happyhooligans
You need to “unlike” my fb page, Linda. Top right button on my fb page.
Katie
Hoping to try this but can’t get my hands on card stock before when I want to try it by. Do you think the ‘slippery’ side of Bristol board can work???
happyhooligans
It probably would, Katie.
shantaelmercedes
What a great idea to incorporate letters and words into this project and I love the use of black paper as it would create a whole new effect! Thank you for sharing this 🙂
happyhooligans
It’s late at night here, and my eyes are tired. At first I thought you said black PEPPER, and I was thinking “Wait… that won’t work.” Hahaha
Susan
I did this activity in my classroom, however, the salt crumbled and came off at the end even when I let it dry overnight. I used the white glue, regular salt, and food colouring mixed with water. I made sure the students used tiny drops.
happyhooligans
Hi Susan. Thanks for leaving your feedback. It made me realize that I should let people know that this art/science activity won’t yield results that are permanent, or that can be displayed upright. I’m sorry if I led you to believe that they could be. I’ve edited the post now, so others won’t think that they’ll have a piece of art that they can frame or display on the fridge or a bulletin board. I hope, despite not being able to hang their art work up, you and your students found the activity fun and educational.
Marilee
I used Epsom salt instead of table salt. It worked really well.
Jackie Currie
That’s great to know, Marilee! Thanks for sharing!