
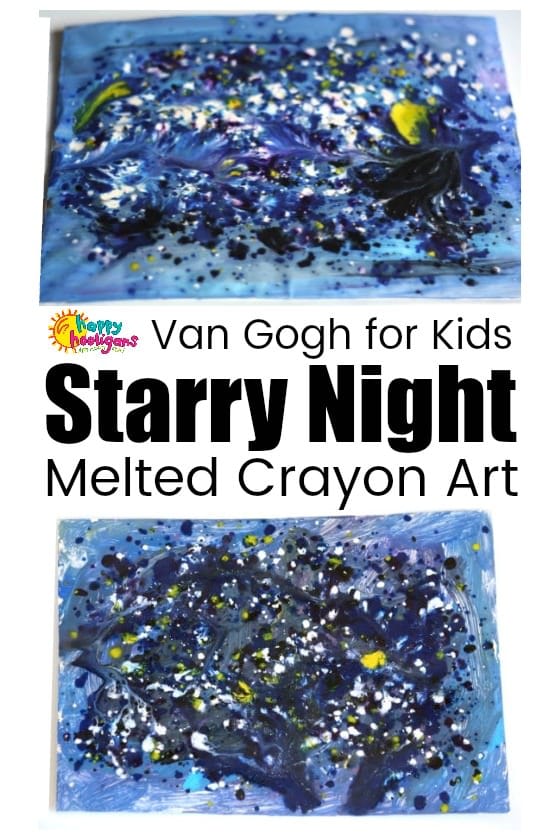
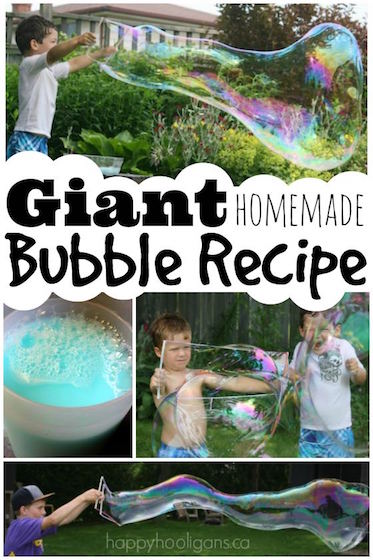
Melted Crayon Art is a fascinating way to make art and a great way to use up your broken crayons. With this easy Starry Night Art Project, kids will have fun melting crayons in the oven to recreate Van Gogh’s famous masterpiece on aluminum foil!
I’m really excited to share our latest daycare art project with you! The kids and I melted crayons to re-create Van Gogh’s “Starry Night”, and the results were incredible!
Related: You’ll also love our CD Galaxy Ornaments
Shout out to Dily Dali Art, whose melted crayon initials inspired this project.
I immediately wanted to try melting crayons with my daycare hooligans, but I wanted our project to be really unique. Yesterday, when I ran across our Starry Night jigsaw puzzle, my plan was hatched.
We would melt crayons to recreate VanGogh’s famous masterpiece.
Like so many of the art and craft projects we do here in my daycare, I had no idea how this would turn out until the end of the process.
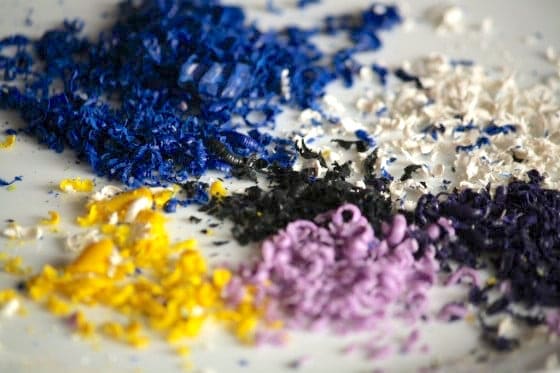
The colours:
We chose colours that represented Van Gogh’s painting:
Blue and purple for the night sky, white for the stars, yellow for the moon and the lights in the distant village, and black for the silhouette of the trees.
The way the crayon shavings melted and blurred together produced a better likeness to the famous painting than I ever could’ve imagined.
And the best news? It was really easy to do!
3 Easy Steps
This project can be done in 3 easy steps:
- prepare aluminum foil
- grate crayons onto foil
- melt in a warm oven
Below, I’ve described the process start to finish.
Begin with a brief lesson about Van Gogh’s Starry Night
This art project provided me with an opportunity to introduce my toddlers and preschoolers to the famous artist and his well-known masterpiece.
I began by showing the hooligans the picture on the front of the puzzle box and we examined the scene of swirling colours.
We also listened to the song “Vincent” (commonly known as Starry Starry Night”) written by Don McLean wrote about the troubled artist.
Then, we got down to creating our Starry Night scenes.
Starry Night with Melted Crayons
Supplies:
- cereal box
- aluminum foil
- Crayola crayons ( we used black, blue, yellow, white, purple)
- acrylic craft paint – (blue, black yellow purple and white)
- paint brushes
- cheese grater
- oven
How to Make Melted Crayon Art
Prepare your canvas
First, each child made a canvas by covering the panel of a cereal box with aluminum foil.
Then, I gave them a paint pallet filled with 4 shades of blue paint, and a shot each of yellow, black, purple and white. They used this to paint their canvases.
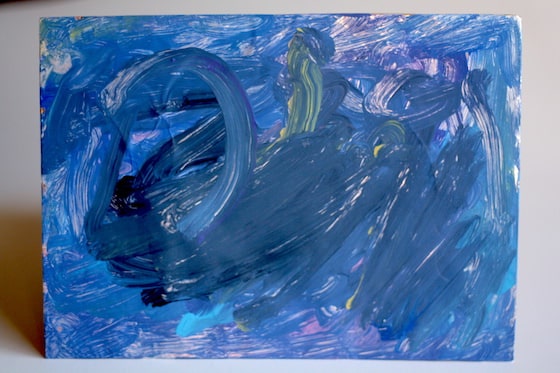
Some of the kids covered their canvases completely with paint, while some made only a few strokes. There’s no right or wrong way to do this. Allow your little one to decide when he or she is satisfied with their work.
While our paintings dried, we prepared our crayons for melting.
How to melt crayons in the oven
Begin by peeling the wrappers off your crayons.
Tip for removing crayon wrappers: the easiest way to peel crayons is to soak them in warm soapy water for a few minutes first. Just rinse and dry after soaking and the wrappers should slide right off.
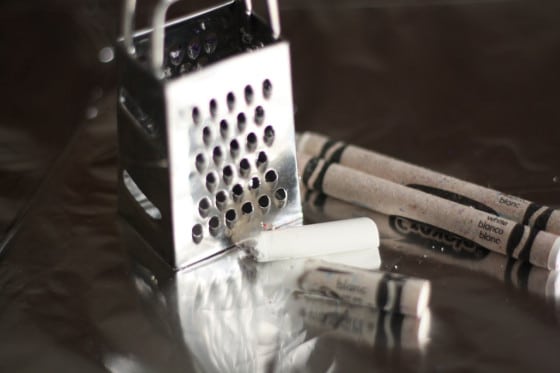
Grate your crayons.
Older children will be able to grate the crayons themselves, but it was a difficult task for my preschoolers, so we agreed that I would do the grating.
I made piles of blue, purple, yellow, white and black crayon shavings for each of the children.
Next, sprinkle your crayon shavings all over your painting, leaving some space around the edges so they don’t run off the cardboard as they melt.
Before putting our art in the oven, our canvases looked like this:
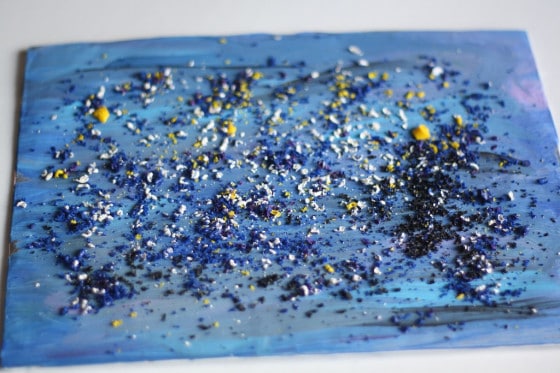
Older children can strategically place their coloured crayon shavings where they want in order to achieve a certain look. Younger children can just scatter their shavings where-ever they wish.
Bake your art
Next, place your art work on a baking sheet and put it in the oven for 5 minutes at 200ºF.
When you take your painting out of the oven, be sure to keep it level because your wax will be very hot and runny.
Fascinating to observe
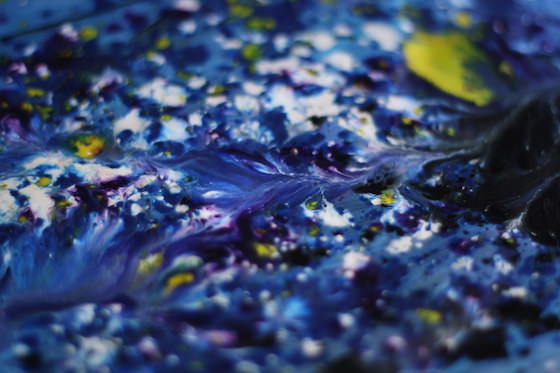
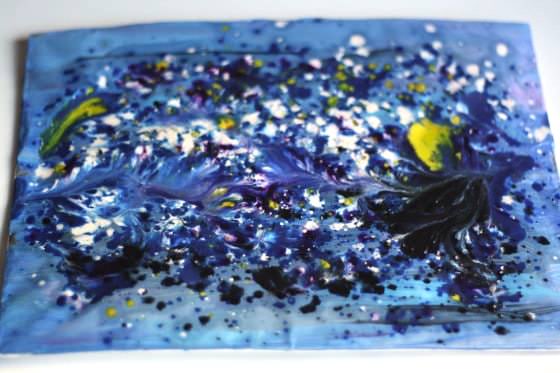
The melted crayon wax will take a few minutes to cool. While it’s cooling, have the kids observe this fascinating process.
Just out of the oven, the colours will continue to pool and run together, but within seconds, they begin to harden.

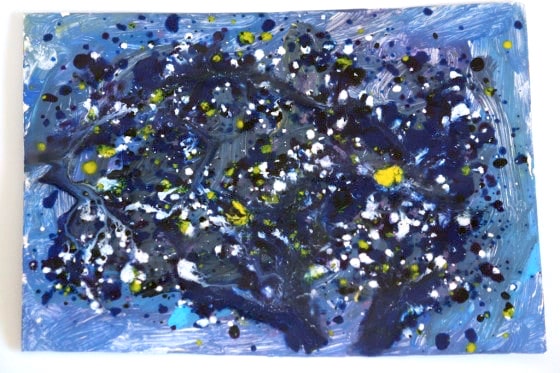
When our creations were completely cool our Starry Night art looked like this:
Aren’t they gorgeous?
Take care not to bend your painting or your wax will crack. If this happens, don’t worry, you can just pop it back into the oven and melt it again.
Displaying your melted crayon art
We wanted to hang our Starry Night artwork on a wall, so I punched a couple of holes in the top of each painting, and added a dark blue piece of yarn so the hooligans would be able to display their masterpieces at home.

These Starry Night projects definitely something you and your child will want to display proudly!
**Edited to mention: several years later, the Van Gogh melted crayon art that I made on this day still hangs on our playroom wall, and it still looks as beautiful as it did the day I made it!
How to remove crayon wax from cheese grater:
I knew you’d ask!
You can melt the wax with a hairdryer and use paper towels and an old toothbrush to remove, but an easier way to remove crayon wax from your cheese grater is to pour a kettle of boiling water over your grater.
If you’re doing this over the sink, be sure to follow by pouring a kettle of hot water down the drain to flush away the wax. A better idea would be to put the grater in a pot of boiling water to melt the wax. Remove the grater and allow the water to cool so you can skim off the hardened wax.
One final alternative would be to not remove the wax at all, and assign this grater to the craft room for future melted crayon projects. 🙂
Time needed: 1 hour
How to Make Melted Crayon Art
- Prepare Your Canvas
Cover a piece of cardboard (i.e. the back or front of a cereal box) with aluminum foil and paint with poster paint or acrylic craft paint.
- Grate Crayons
Peel your crayons and grate them onto a plate or a piece of wax paper.
- Sprinkle Grated Crayons on Canvas
Arrange your crayon shavings on your foil canvas
- Bake
Place your foil canvas on a baking sheet and place in the oven for 5 minutes at 200ºF.
- Remove from Oven
Remove baking sheet from the oven, taking care to keep it level so you don’t disturb your melted wax design.
- Let Cool
Allow the melted crayon wax to cool completely before removing it from the baking sheet.
- Hang Your Art
Punch two holes in the top of your cardboard and string a piece of yarn through for hanging.
More cool art ideas for kids:
- Salt, Glue and Watercolour Art
- Crystallized Beach Rocks
- How to make Marbleized Paper with Shaving Cream & Food Colour
- Silhouette Art – City Skylines
Get the 3-5 Playful Preschool e-Book!
25+ Preschool activities by 25 bloggers, 10 printables, PLUS 50 links to activities not featured in the book.
Click to download your copy now!

Follow the Hooligans on Facebook!

Jackie is a mom, wife, home daycare provider, and the creative spirit behind Happy Hooligans. She specializes in kids’ crafts and activities, easy recipes, and parenting. She began blogging in 2011, and today, Happy Hooligans inspires more than 2 million parents, caregivers and Early Years Professionals all over the globe.


Yvonne
Wonderful, great job, I knew it was crayons lol…could you use a heat gun used in cardmaking. I have also seen crayons placed in a row and stuck to a canvas at the top and then blow dried with a hot setting and it all runs down the canvas. You could use cereal boxes as well I would imagine. 🙂
happyhooligans
Thanks, Yvonne! I’ve seen the ones with the crayons across the top. Those are so neat! I’d love to try that one day. I’m not sure about the heat gun – I’ve never used one. It’s worth a try if you have one though!
katepickle
ooooh cool!
Laura
Oh my goodness, those turned out so cool! We’ll have to give it a try.
happyhooligans
Glad you liked them, Laura. Yes, you have to try them out. It’s such a neat process. Have fun!
Amy Osborn
I think we will try this with valentines colors, thank you for sharing!
happyhooligans
I’m planning to do the same, Amy! Won’t that be gorgeous?
Katherine Lockett
these are beautiful. I might try it with glitter in the mix too. 😉 Silver would be pretty for a night sky. 🙂
happyhooligans
Let me know how it works with glitter, Katherine! You know how I feel about the stuff. lol
Rebecca
What a fantastic effect. I can’t wait to see the Valentines colours!
Inese Boki�a
Thanks for idea how do this art better, because we tried to heat crayons with a hairdryer, but it was not work. The crayons flew away! Now we will try your way!:)
happyhooligans
Glad to help, Inese! Have fun with it!
Erin
I LOVE it! Now I have to go digging around for old crayons to grate up!
Aleacia @ Dilly-Dali Art
Lovely job by the Hooligans! We love melting crayons so I bet they had a blast!
Jen Gibbons Shaffer
Jackie, they are gorgeous!
Ashley
These are gorgeous!
Ashley
Hit submit too quick! I’d love for you to come link these up at Mom’s Library! Have a great day!
http://lifewithmoorebabies.blogspot.com/2013/01/moms-library-3-for-me.html
Maria
You and your hooligans are really fantastic, you are creating great artists!!We`ll try it this weekend, I think it�s going to rain a lot in Madrid.
Thanks for sharing!
happyhooligans
Thanks, Maria. Have fun with this!
Martha Ryan
hi- love the idea!! but i was wondering- I read some of the comments but not all so I apologize if this is repeated. Do you think using real artists canvas would be possible? I would love to have something a little bit more substantial and permanent.
Thanks for sharing!!
Martha
happyhooligans
I have no idea, but it can’t hurt to give it a try, Martha. 🙂
Diana
I saw that someone suggested using a real canvas. I wonder if you could and apply heat from underneath with a heat gun or hair dryer. I may attempt as long as the air doesn’t blow easily through the canvas. I’m an art teach and could see my preschool kids loving this but I would have to recreate in a classroom.
Terra
Or use an embossing gun or incorporate daddy with his torch on low from a far or back and forth over it to watch them melt
Kiruthika Curic
OOO so cool. I found this from the imagination tree linkup. We have a plastic grater which I think the kids can handle. trying soon.
Jodie @ Growing Book by Book
What a neat idea! I also like doing this in the oven vs. a hair dryer. Thanks for sharing.
happyhooligans
I don’t think I’d want to use a hair dryer for this one. I’m thinking crayon shavings would be EVERYwhere! LOL
Vicky from Mess For Less
I have never seen this technique before. The results are stunning. Excited thinking about all the color combos you can do. Pinning now!
Debbye Parker-Kinman
These are gorgeous! This is bookmarked for when my hooligans are a little older!!!
Wendy Kennedy
What about a blow dryer ? Love this
happyhooligans
I wouldn’t try a blow dryer, Wendy. The crayon shavings would be everywhere as soon as you pointed the dryer at them.
Allison
Love these! I was just picking up broken crayons up off the floor…this would be great! 🙂 Thanks!
jj
Thanks for the inspiration! we have a collection of broken crayons I was going to melt down. This looks like a great use for them
Lea Ann
Those came out cool. We just made an art project with cheese-grated crayons this past weekend too! Can you believe how many broken crayons one accumulates? Gah. http://mommyswishlist.blogspot.com/2013/01/how-to-make-crayon-cloisonne-kids-art.html
maggy, red ted art
SUPER BEAUTIFULLY and wonderful. What a fantastic bit of art. LOVE Starry Night and your artwork and method is just fantastic.
Thanks for joining in with Kids Get Arty.
Maggy
Ann
Very cool! Like some of your other commenters I think we’ll have to do this for Valentine’s Day.
Amy
Just did this. I would recommend one of those cheap plastic pencil sharpeners instead of a grater. We tried the grater and it was very messy. LOL. But the sharpener worked great!!! 🙂
happyhooligans
That’s a brilliant idea, Amy!
Valerie Cox
We used one of those little hand cranked cheese graters. Worked like a charm.
happyhooligans
Great suggestion, Valerie! Thanks!
Sherry
I also found the pencil sharpener much easier than the grater. My 5, 8 and 45 yr old 😉 were all able to help. We collected the shaving right into zip lock bags. Static cling was our biggest challenge. Seemed to vary by colour and brand. We plan to use a blow drier with the shavings between two pieces of wax paper.
pegges
oh wow…thats awesome. many pay lots of money for abstract art like that!
Katie @ Gift of Curiosity
Very cool! I love how these turned out! And Starry Night is one of my favorite paintings, too. 🙂
Ashley
Did you paint on the aluminum foil?
happyhooligans
Yes we painted on the foil first with acrylic craft paints.
Ashley
Thank you:) I love this. We are going to do it next week!
Tina
It’s a great art work. But I wonder if the paint will pill out of aluminum when it’s dry?What other choices do you have other than aluminum ?
Jackie Currie
Not at all, Tina. We’ve had ours hanging in the playroom for years, and also a Valentines piece of art that we made the same way. Don’t worry. The wax will stick. 🙂
Stephanie
I love this idea. I think we’ll head outside and see the real bright Texas stars then head inside the next day and try this out. Very creative!
jtulip
Great one! I love the way the crayons look. Thanks for sharing at Mom’s Library! Pinned.
Jessica Lovitt
Love it! Will try that with the kiddos for sure! (My son has a big print of Starry Night in his room, so this is near and dear to our hearts!)
Ashley
Still love this! Just stopping by to let you know I will be featuring it this week on Mom’s Library! Hope you stop by again!
http://www.lifewithmoorebabies.blogspot.com
Melissa (@ChMuffinTree)
Gorgeous! These are beautiful!
Allison
This is just magnificent. We love melted crayon art, and I really love the way you introduced Van Gogh to them. I am going to have to do this with my older boys. My five year old is especially obsessed with melted crayon art, and I think he will absolutely be thrilled.
I will be featuring this tomorrow on The Sunday Showcase.
artclubblog
This looks spectacular! What a very cool idea.
happyhooligans
So glad you all loved this one. I think this will go down as one of my all time favourites! We’ve done another one since the Starry Night project! Can’t wait for you to see it! It will be live on the CBC kids’ website on Feb.13th!
India
I did this with my 23m old yesterday! We did a little bit of modification though and I wanted to share it with you! I was out of paints so we did a construction paper collage on the cardboard which turned out great. The other thing I did differently was breaking up the crayons by putting them in a bag and hitting them with a rolling pin. It was a lot less work and still made them into tiny pieces. You’re so inspiring and we use ideas from your blog often! Thank you so much and keep it up!
happyhooligans
Great ideas! I love it when we’re inspired by something we’ve seen, but we tweak it so it works with what we have on hand. Smart thinking to use the rolling pin for breaking up your crayons!
Julie Jeong
I love this idea — our school celebrates one artist a month. Without an oven, we’ll have to lay them outside on a sunny day but I can’t wait to try it this summer!
Jessica Lovitt
Did this today! Kids and I loved it. They are now hanging on our wall. I picked up some cheap black frames and they were so proud to see them hanging up so nicely. Thanks for the idea and the great tutorial… (A big canvas print of Starry Night hangs in my son’s room and is the inspiration for his room so this was close to our hearts and fun to explore ourselves.)
Nikki
Is it perfectly safe to put acrylic paint and cardboard in the oven?
happyhooligans
At that low heat it is, Nikki.
Shannon
ooooh this is fabulous!
Emma
This is awesome – the process AND the product!
shine Jenny
What a great idea! I will try with my son! : )
Taryn
We tried this with a canvas and then used a hair dryer to blow from underneath to melt the crayons. The canvas was thin enough to be heated from behind and it didn’t blow the crayon shavings away. You have such fabulous ideas on this site, it is a source of inspiration for all the craft that goes on in our house.
Kim
instead of using a grater we put the crayons in a sandwich bag and pounded the crayons with a hammer. I did this with my 10 yr old, 8 yr old and a 13 yr old neighbor.
Karoline
hello, can I poster paint?
happyhooligans
I’ve only ever used acrylics, Karoline, but I would think it would work with other paints. The only question might be whether the paint would crack and flake with the heat of the oven, but you don’t know until you try, right? Go for it.
French Cardamone
Thanks for sharing that idea. Looks beautiful.
Lisko
We’ve done some grate’n’melt art. We love it every time. The only problem is cleaning the grater afterwards. Any thoughts? 🙂
happyhooligans
Yes! Just pour some boiling water over the grater. The wax comes right off. 🙂
Kelly
I just tried this with my 3 1/2 and 1 1/2 year old sons, and they came out so awesome! Thanks for this great idea.
happyhooligans
Yay! So glad you guys loved it, Kelly!
Anissa "Li'l Bit" Rodriguez
Wonderful! Absolutely wonderful, and with crayons, too? WOW
kara
I’m guessing when you say 200 degrees that it’s celsius, yeah? 🙂
happyhooligans
No, Kara. It’s Farenheit. The lowest setting that my oven will go to.
Kara
Oh well it’s a good thing I asked then or it could have been a disaster! Thank you 🙂
happyhooligans
Phew! Yes!! Good thing! lol Have fun with it, Kara! 🙂
Louise
Oh wow! So wish I’d found your blog a few years ago when au-pairing.. Made the first step today with my 4 year old, we used greens for background, and will do bright colours for the wax to hopefully create a wild flower field look to go in a frame on my tv stand 😀
synevabarrett
I just tried this and couldn’t get it to swirl. Looking at your photos it doesn’t look like you put that many crayon shavings on. Wondering if the problem is that I only had Rose Art crayons on hand.
happyhooligans
I might be. We’ve done it a few times now, and I think we use crayolas.
Molly
Would this work if I had the kids color the foil with sharpies? All we have is tempera paint and I don’t want it to come right off. Also, not trying to have anything explode or start a fire. 🙂 please let me know ASAP as I am trying this on Monday.
happyhooligans
Hi Molly. I’m guessing you could use the sharpies. Or you could skip that step altogether, and just go with the grated crayons. I wouldn’t worry about anything catching fire or exploding though. The oven is at such a low heat and your art is only in there for a short time. Let me know if it works with the sharpies.
Molly
Thanks so much and will do! Also I didn’t expect yout to answer so quickly so thanks! Also I have been using your website for all sorts of crafts. I babysit a lot and all of your crafts are great and inexpensive. Thanks so much!!!!!!! 🙂
happyhooligans
You’re so welcome, Molly! I’m so glad you’re enjoying our activities!
Molly
So I tried it out with the sharpies and it worked great… The kids liked drawing things behind it and didn’t use a lot of crayon so you could still see the background.
happyhooligans
Wonderful to hear, Molly! I’m so glad it worked for yoU!
Micheal
We are doing a red, white, and blue theme for the Fourth. Probably with glitter since my youngest hooligan is 7. These are going to be so great”
happyhooligans
Awesome idea!
TheBoyandMe
Starry night is my absolute favourite Van Gogh painting, love this and will definitely be trying this method.
Still Playing School
Thanks for the tip for washing the grater! We love to use our embossing tool to melt the crayons (it’s more direct than the hair dryer).
lexigirl60
would suggest one uses a pencil sharpener to “grate” the crayons–safer forall, especially ssmall fingers of children. if this is a repeat of someone else’s suggestion, you have my apologies.
happyhooligans
That’s an excellent suggestion!
Dawn Sullivan
Would a hairdryer work rather than an oven. Don’t have oven in room and would love for kids to see wax melt.
happyhooligans
I’m sure it would, but I’m wondering how you’d prevent the shavings from blowing all over the place.
Terra
One girl said they used a blow dryer through the back of a canvas to melt them, or you can use use an embossing gun also
Nanny2girls
I can’t wait to try this with the girls nanny. Just making sure do the kids paint on the tin foil.
happyhooligans
They don’t have to, but yes, we painted on ours. Have fun!
Ellen Quinones
Any suggestions on whether we can varnish or seal our art? Also we used the Hershey bliss chocolate foil wrappers lol (gotta reuse or recycle right?).
Sara Hendrickson
I would love suggestions too on sealing. Our paint is separating from the tin foil, any tips on how to keep it on? I may have to wrap them in Saran Wrap . . . 🙂
happyhooligans
What kind of paint did you use, Sara? Tempera is known to flake and peel. Acrylics do not. If you used temperas though, they’ll run and smear if you brush on a sealant, as they’re waterproof. You could try a spray varnish, but I’m not sure if the wax would resist it. Wish I could be of more help… Sorry!
Patty Yeary
Is there any way you could use a medium other than foil? Thatt way you could melt in microwave.
Paula Kelly
Me and my girls 8 and 3 did glass ornaments with crayons. I tried the grater first then found that a pencil sharpener was easier for the girls.
Evie Jo
When teaching elementary art grades 1-6, I would use an old cheese grater for shredding old crayons. However, that can take a toll on knuckles and fingers. Myyy solution: crayon/pencil sharpeners! The cheap plastic ones with a storage cup attached. Ooooh, and my 6th grade art helpers. They loooved shredding crayons! You could even control the colors and keep colors separated in little margarine tubs.
Christine
I bought an old plate warmer at a tag sale for a dollar. Plug it in, it heats up nicely, and the boys can color directly on paper for melty, swirly colors, or just place it on the warmer to melt the shavings. Thrifty and fun!
phalguni
can we use any other ways to melt the crayons other than putting them in the oven?
happyhooligans
I’m sure you likely can. Let me know what you come up with!
jodie kilbourne
Going to do this for our spring break! My kids will love it
Jeanine
Oh wow, wow, we have to try this version! This is one we have not tried, while recreating our own Starry Nights with playdough, store bought, homemade with buttons and glow in the dark playdough, paint, but melted crayons: We are SOO doing this one! My daughter looks when I say that and says oh no, starry night again? LOL YUP, again! So excited. As we get ours done, I will come back and share a link! Thanks again.
sanjana
Can I just color on a paper and put the crayon shaving and cover it and iron it using iron box, will it work
happyhooligans
Sounds like fun! Give it a try!
ABJenkins
This looks fun …… Has anyone ever tried this in the microwave? ……. I would love to try this during after school
happyhooligans
I’m not sure what crayon wax would do in the microwave, but if you’re going to try it, definitely do not wrap your cardboard in tinfoil first! 😉
Yen
Hi, does it matter which side of aluminium foil to paint on?would love to do this art with my 4yo n 1.5yo 😉 Tqvm
happyhooligans
No, either side will work, Yen!
Yen
Also, is it possible to use tempera paint on this art?
happyhooligans
You might be able to. I haven’t tried, Yen. Sorry!
Shanna
Absolutely love this! Glitter was a great addition. I didn’t keep a close enough eye though and the crayons melted a little too much and went flat. When using the pencil sharpener the shavings are very thin so keep that in mind. We will be doing this again and I think use shavings AND larger pieces to add texture. My 8 year old said ours looks like galaxies which I love!
erickajen
would it have to be done on tinfoil? could it be done on paper? would that make it more “stable”?
happyhooligans
I don’t think it would be anymore stable – the melted wax is quite thin and runny. I also think the oil in the wax would be absorbed into (and stain) the cardboard or paper without the foil there to protect it.
Kate
An idea of how kids can make their own crayon shavings without grating their fingers off – I remember that as a child I loved to make shavings of wax crayons using a pencil sharpener. Since the crayons are softer than wooden pencils it’s quite easy to turn them while your fingers are still on the small side and the process of creating this thin layer of something that is no longer a crayon now was really fascinating to me. I guess the shavings might come up pretty big this way, so they might need to be broken up using a butter knife or a popsicle stick or whatever works.
happyhooligans
That sounds like a terrific activity leading up to creating the art, Kate! Thanks!
L G
Wonderful idea and the kids loved doing it. Only slight blip, was you oven on 200 c or f? Mine was at 200c. And after 2mins the kitchen was filled with smoke and the wax had splattered everywhere! Fun activity but the cleaning afterwards was not so fun.
happyhooligans
Oh no! Yes, it’s fahrenheit. I’ve edited the post to clarify that. I’m so sorry about your experience!
gabby frascinella
The project is lovely and I will be doing it. The tip for cleaning wax off the grater was incomplete at best and not a full disclosure of its’ problems. Pouring very hot/boiling water over the grater will remove the wax and deposit it someplace else. If your doing it over the sink or the toilet or into another container, you’ll be scrubbing out said sink, toilet or container. The water cools and the wax will stick to whatever it touches. Easiest way to clean wax from the grater is don’t clean the greater. It is now your designated Wax Grater. OR you could use mineral spirits or paint thinner to disolve the wax. Or use a hair dryer and a lot of paper towels to wipe off wax in small sections. Last tip I have is a tea-kettle of boiled water and a damp sponge with a lot of dishwasher soap. Dawn is probably the best one to use. Soften the wax in small areas and immediately scrub with the soapy sponge. Repeat until clean. This one sounds labor intensive and messy but it’s a choice. I’m going with the designated Wax Grater myself. KISS>
Sam
Do you tape the tin foil to the cardboard so that the foil is the actual canvas?
Jackie Currie
Yes, the foil becomes the canvas, Sam.