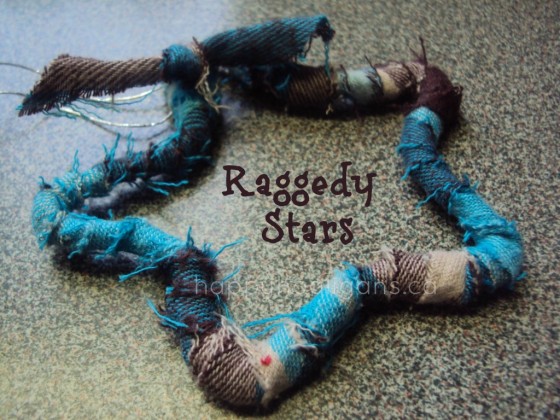
Homemade Rag Star Christmas Ornaments – an easy Christmas craft with pipe cleaners and fabric scraps.
I’ve been making these Rag Star Christmas Ornaments to attach as homemade gift toppers to the Christmas gifts that I’m giving this year. Everyone is getting a set of 5 of these little rag star ornaments in place of a bow. I’m also including individual stars with our teachers’ and neighbours’ gifts this year.
As far as homemade Christmas ornaments go, these are a snap to make. You need only two things to make them: fabric scraps and a pipe cleaners.
You’ll also like our Fabric Scrap Christmas Cards and our Fabric Scrap Christmas Trees.
I was inspired by Heather at Dollar Store Crafts, who used strips cut from a winter scarf to cover her stars. Be sure to check those out. They’re cool. I used a couple of torn/expired shirts that I had in my scrap fabric stash.
What type of fabric is best?
It’s best if your fabric has a print that shows on the back as well as the front, as the strips tend to twist when you’re wrapping your stars, and you’ll want to see the pattern no matter which way the fabric is facing.
Heather calls these 10 second ornaments, but it took me longer than that to make one. Not a whole lot longer though. It’s a fairly fast and easy project. Once you’ve done a couple, you kind of find your rhythm with the wrapping process.
How to make a star ornament with pipe cleaners and rags:

For your conviencience, this post contains affiliate links. As an Amazon associate, I earn from qualifying purchases.
Supplies:
- scrap fabric ( I like to use something with weight like a flannel or jersey knit)
- pipe cleaners

- cookie cutter
- ribbon or cord for hanging your ornament

Instructions:
Start by molding your pipe cleaner around your cookie cutter. Twist the ends around each other to secure.
Cut your fabric into 1/2 inch strips. You don’t have to be exact here.

Wrap your fabric all the way around the pipe cleaner. I left a couple of inches hanging when I started. That way I could tie a knot or a bow when I got all the way around.
That’s all there is to it! Isn’t that one of the easiest homemade ornaments ever?
Now just thread some ribbon or cord through the back of the knot to hang your ornament.
Voila: simple Rag Star Christmas Ornaments!

Aren’t they rustic and cute?

I used this flannel shirt for my second set of raggedy stars. I think these are my favourites.

And look what I gleaned from the shirt before I started cutting it up!

Score! You KNOW how much I love buttons!!
Be sure to check out ALL of our easy and inexpensive Christmas craft ideas on my Hooligans Xmas Pinboard!

Jackie is a mom, wife, home daycare provider, and the creative spirit behind Happy Hooligans. She specializes in kids’ crafts and activities, easy recipes, and parenting. She began blogging in 2011, and today, Happy Hooligans inspires more than 2 million parents, caregivers and Early Years Professionals all over the globe.


Maureen Antoski
Those are so awesome and would fit my tree so well, not to mention a great craft for the kiddlets!! Thank you!!!!
Maro's kindergarten
I love this idea! I will try it for Christmas decoration!
Paolina
Do stars bend out of shape after use? (Like when shoved in a box of ornaments for a year)
Becky Goddard-Hill (@abeautfiulspace)
Oh these are abulous!
healingmykids
Your links for the cutters and ribbon all lead to the pipe cleaners on Amazon.
happyhooligans
Thank you! I had a major blog glitch last year, and it caused a lot of my links to go astray. It’s a huge task fixing them all, so I imagine there are quite a few more out there that are off. Thanks for the heads up. 🙂