
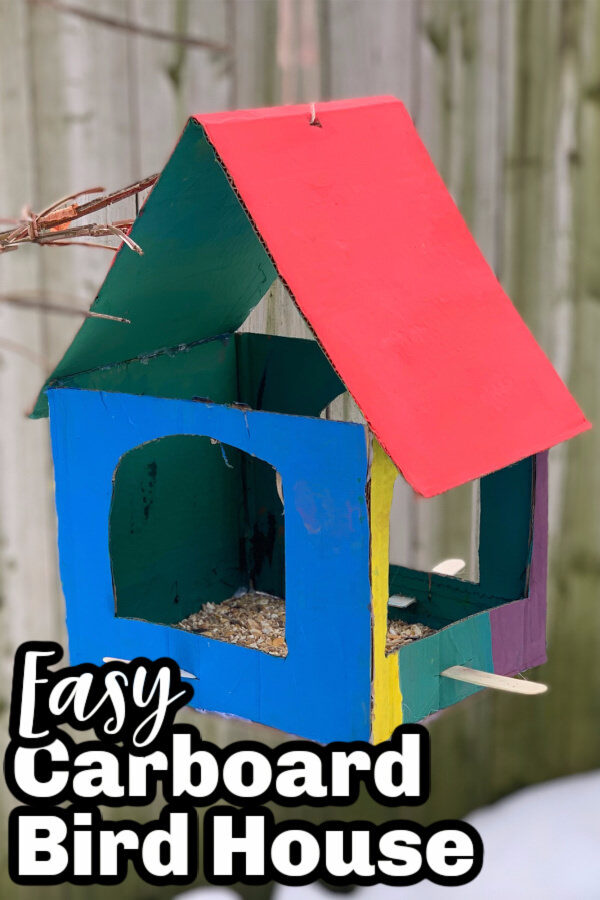
This easy homemade cardboard bird feeder is a wonderful way to celebrate the start of spring with your kids. Create a bird feeder out of cardboard for your backyard birds to enjoy!
Hey, Lovelies! We have a special guest today! Mandisa, from Happy Toddler Playtime, is here to show us how to make a colourful homemade bird feeder out of a cardboard box!
Last spring our backyard was full of new and wonderful birds! We saw Blue Jays, Cardinals, Robins and Red Winged Black Birds to name a few. It was so incredible to discover and learn about them with my then 5 year old and 2 year old twins. We became mini-bird watchers for several weeks. The quiet streets gave these birds the opportunity to come out into the open for the first time and we loved it!
This year, things are still quiet, but not as much, and I am hoping that we will be able to see a diverse array of birds again. To help entice them back to our tree-lined backyard, I decided that it was time we set up a bird feeder. Being an activity mom, I knew that we were not going to just buy one.
I’ve been doing a lot of activities using cardboard recently, so I thought why not make a little bird feeder out of that!
ADULT SUPERVISION IS REQUIRED
This activity requires scissors for cutting cardboard or box cutters and a hot glue gun. These should only be handled by an adult.
Supplies:
- Cardboard
- Scissors or box cutters
- Tempera Paint for Kids and brushes
- Wooden Craft Sticks
- Hot Glue Gun
- Bird Seed
- Twine or string
- Liquid Chalk Markers or Sharpie Oil-Based Paint Markers
How to Make A Cardboard Bird Feeder
Time needed: 45 minutes
Painted Cardboard Bird Feeder Instructions
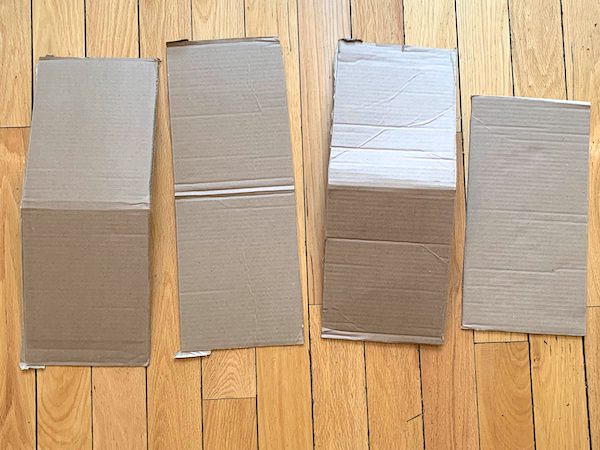
- Cut Walls, Roof and Floor
Grab a cardboard box and cut out 3 strips 26cm x 15cm each (these will be the walls and roof of the feeder). Cut out a square 13cm x 13cm (this will be the bottom of the feeder).

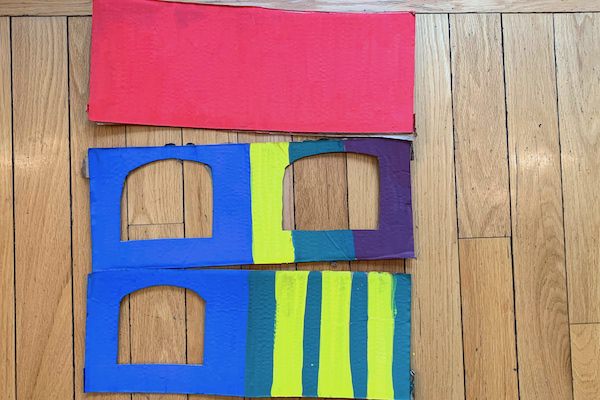
- Cut Feeding Hole Openings
On the strips that will be the walls, cut out 3 large openings on only 3 sides using box cutters. Remember an adult should be doing this part of the activity. Leave the fourth side intact. It will be the back of the bird feeder. Be sure to leave enough room at the bottom of the openings to place your bird perches.
- Paint Cardboard
Paint the 3 cardboard strips on both sides and set them aside to dry. There’s no need to paint the square bottom piece. Depending on the colour and type of paint you use, you may need to apply more than one coat of paint.

- Attach Walls
Fold one strip in half and run a bead of hot glue along the edge of one side of the strip. Press and attach it to the another strip. Do the same to the other side to create the walls of your bird feeder. Hold for a minute or two to secure together.
- Attach Floor
Turn your bird feeder upside down and put glue all along the bottom edge of the bird feeder and attach the square piece of cardboard as the floor of the bird feeder. Use the hot glue gun to seal any holes or gaps between the walls and the floor so birdseed doesn’t not fall out.
- Make Slits for Perches
Use box cutters to make a thin slit just below the openings on 3 sides of your bird house. The slits should be large enough to fit your craft sticks.
- Attach Perches
Cut 2 craft sticks in half and slide each half through the slits. Use the glue gun to secure them. Put the glue on the inside of the bird feeder.
- Make Holes for Hanging
With your box cutters or scissors, poke holes in the top of the roof. Slip a piece of twine through and tie it in a knot.
- Decorate
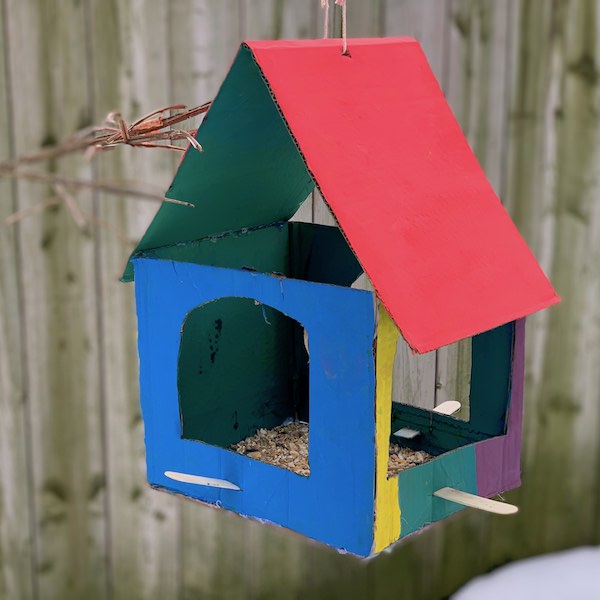
Decorate your bird feeder using chalk markers or paint markers!
- Fill and Hang
Pour some birdseed into the bottom of the feeder and hang it up on a nice dry sunny day.
NOTE: Cardboard is not water proof so do not leave your bird feeder outside in the rain. If you want to make your feeder water proof, spray it with a water proof sealant. This should be done by an adult and in a well ventilated area.
You may also like:
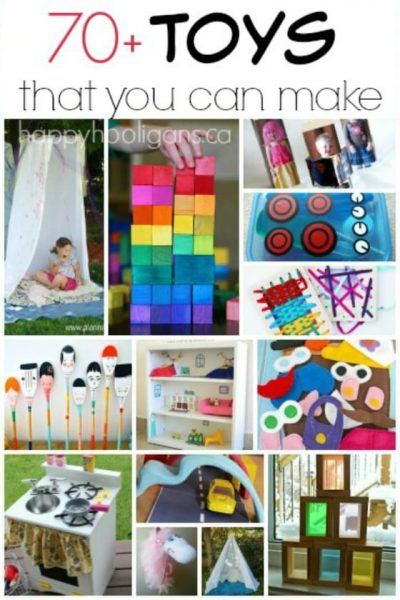
32 Homemade Bird Feeders To Make With Kids This Winter
25+ Easy Bird Crafts for Toddlers and Preschoolers
About the Author Mandisa Watts
Mandisa is a CPA/ MBA, mother of 3 (including twins) and founder of Happy Toddler Playtime, an online resource for parents, teachers and caregivers showcasing open-ended, and child-led activities and crafts. Mandisa shares kid-approved, colorful playtime activities that involve art, sensory play and learning. Mandisa is also a published author with her book “Exciting Sensory Bins for Curious Kids” and a new book “Super STEAM Activity Book for Kids” coming out June 2021. You can find more tips and play ideas for kids 0-7, here and activity ideas on her Instagram, Pinterest, Facebook, YouTube and TikTok pages.

Jackie is a mom, wife, home daycare provider, and the creative spirit behind Happy Hooligans. She specializes in kids’ crafts and activities, easy recipes, and parenting. She began blogging in 2011, and today, Happy Hooligans inspires more than 2 million parents, caregivers and Early Years Professionals all over the globe.


Business Directory
I agree. Milk cartons are an easy starting point for a bird feeder All you have to do is cut holes for the bird food and hanger, and then decorate it.
Nina Paul
This looks very interesting, this is a perfect activity to keep kids busy for their summer vacation.
ModernMindfulMom
What a fun craft! Love that it’s made of materials commonly thrown away or recycled!
EtonHouse
just love it!