
This easy step-by-step tutorial will show you how to make extra-large, reversible flannel receiving blankets for a baby. These homemade blankets make great shower gifts. These blankets are perfect for swaddling, or to use in the playpen or stroller, or to wrap toddlers in after the bath.
Beginner sewing project. Time to complete: 1 to 1.5 hours.
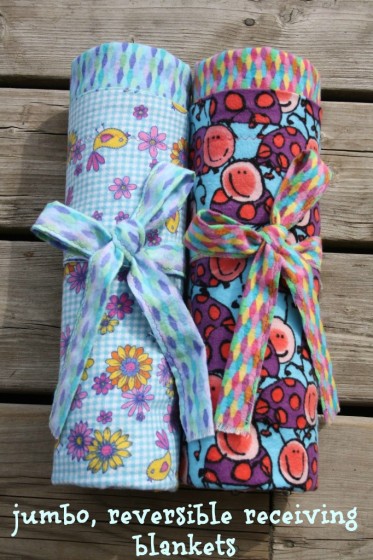
These huge, cushy, double-sided flannel receiving blankets are one of my favourite gifts to make for a new baby. Because they’re so big, cozy and durable, they can be used from The time a baby is born until he’s 2 or 3 years old.
What is a receiving blanket?
A receiving blanket is a flannel baby blanket that serves many purposes. Smaller receiving blankets usually measure about 20″ x 20″, and are used for swaddling a newborn, as burp pads, and absorbing spills and accidents. Larger receiving blankets are great for the stroller or car seat, as a play mat and for wrapping baby after the bath.
A must-have for a new mom
A flannel receiving blanket is a must-have for a new baby and a staple for a new mom, for home and for the diaper bag.
When my babies were born, I acquired quite a lot of receiving blankets – some from the hospital, and some as baby shower gifts.
My favourite receiving blanket ever
My all-time favourite receiving blanket was a huge, reversible flannel blanket that a friend gave us when our second son was born. It was larger than a standard receiving blanket and measured about one meter (almost 40 inches) square. I used it for years.
I loved that blanket. It was one of my favourite baby gifts ever, and probably the one that got the most use over the years.
Since then, I’ve made dozens of the same kind of receiving blanket to give as baby shower gifts to friends, neighbours and daycare families. They are always well-received, and loved.
If you can sew a straight line, you can make this!
This easy, flannel receiving blanket is a great sewing project for beginners and a great project for kids who want to learn to sew. It’s a quick and easy process, requiring only basic sewing skills. Your measurements don’t even need to be precise.
Seriously, if you can sew a straight line, you’ll be able to whip this blanket up with no problems at all.
How big is this receiving blanket?
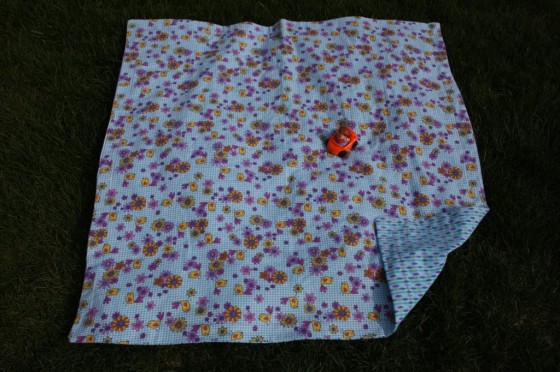
Finished, these receiving blankets measure approximately one meter by one meter. For those of you in the US, a meter is roughly 3 inches bigger than a yard. Being flannel and double-sided, they’re really cushy and cozy.
Ways to use this blanket:
- to swaddled your baby as he outgrows his smaller blankets
- tuck into the car seat or stroller when the weather is chilly
- as a crib blanket or a floor blanket
- wrap a toddler in after the bath
My favourite way to use this blanket as my son got bigger was to wrap him up in it after the bath. The blanket is large enough that I used it that way until my son was 2 or 3 years old.
This next photo should give you an idea of how big the blanket actually is. I placed a “Little People” car on it to give you some perspective.
Ok, let’s walk you through the process of making one of these awesome baby blankets.
I’m going to assume you’re new to the sewing scene, so I’ll make things as simple as possible.
For your conviencience, this post contains affiliate links. As an Amazon associate, I earn from qualifying purchases.
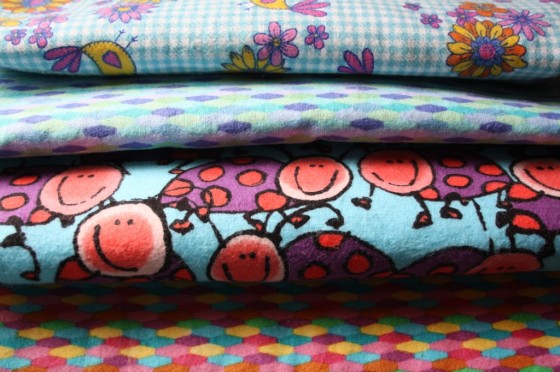
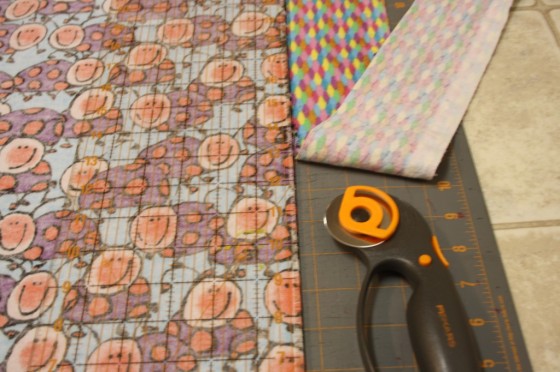
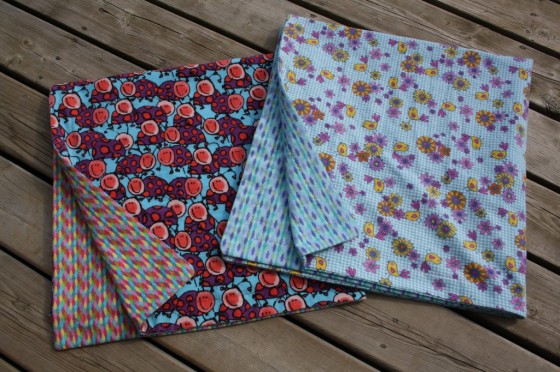
Supplies and materials:
- 1 meter of flannel for front of blanket
- 1 meter of coordinating or contrasting flannel for back of blanket
- spool of thread to match front fabric ( I use a contrasting colour that will really “pop”)
- spool of thread to match back fabric
- sewing scissors

- a rotary cutter and cutting mat (handy but optional)
- steam iron
How to make your receiving blanket:
Pre-shrink your flannel!
Before you begin, you must PRE-SHRINK your flannel by washing it and drying it in the dryer on high heat. Flannel shrinks, so if you don’t preshrink, your finished baby blanket will shrink the first time you wash it which could affect the shape of the blanket.
I like use my homemade laundry detergent to wash my flannel. I use it for all of my laundry needs, but I particularly like to use it for the receiving blankets because we’re going to be wrapping a sweet, precious baby in this, so chemicals, scents and toxins have no business being anywhere near this fabric.
Iron and cut your fabric
One you’ve washed and dried your flannel, iron it well.
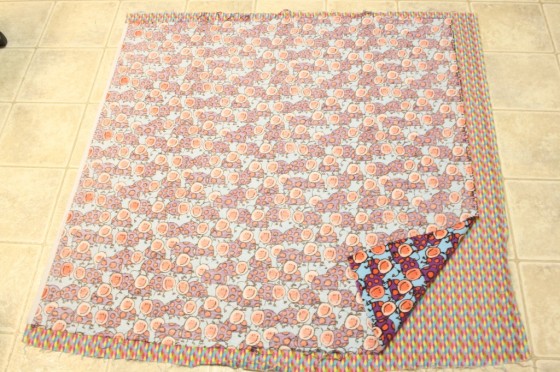
Lay your two pieces of flannel together, with the good sides together (also known as “right sides facing”), and trim your flannel to (roughly) 1 meter by 1 meter.
You can use scissors, but a rotary cutter (affiliate link) will make the job easier and faster.
Save your strips
Don’t throw away the strips you trimmed off. We’ll use those to tie the blanket up nicely before giving it as a gift.
Pin and stitch
Pin the edges of your fabric together and take it to your sewing machine.
Using a 1/4 inch seam allowance, stitch around all 4 sides of your blanket, leaving an opening about 6 inches long somewhere along one of the edges. You’ll use this opening for turning the blanket right-side-out.
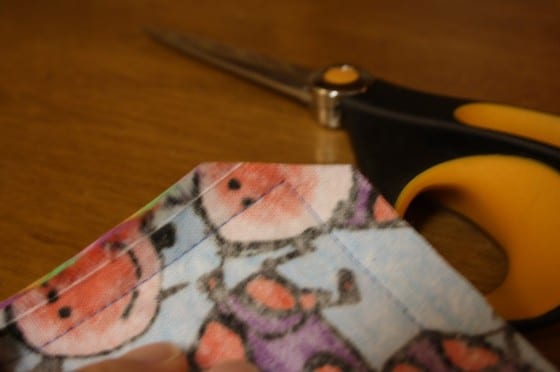
Snip your corners so they won’t be bulky when you turn your blanket (see photo below). Be careful to not snip through your stitching!
Turn it right-side-out and close hole
Flip your blanket right-side-out through that 6 inch opening that you left along the edge of your blanket.
Reach your arm in through the opening, and poke the corners out so they’re nice and square.
Iron around the blanket, pressing your edges so they’re nice and crisp. When you get to the 6 inch opening, turn the unfinished edges to the inside, and press in place.
Pin the opening shut and pin all around the edges of the blanket to keep the two layers of flannel together during the next/final step.
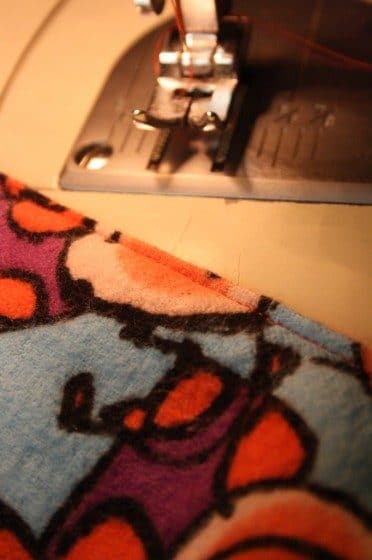
Back at your sewing machine, close the opening by stitching very close to the edge of the blanket.
You can see in this next photo how close to the edge I stitch to the edge when I’m closing it up.
Add a zig-zag border
Now it’s time to put a decorative, zig-zag border around the edge of your blanket.
I place the foot of my sewing machine about 2 inches in from the edge of the blanket for this step. I set my zig-zag dial to #3 for this.
**To lock your stitches in place when starting and stopping your stitching while zig-zagging, set your stitch length dial at this setting…
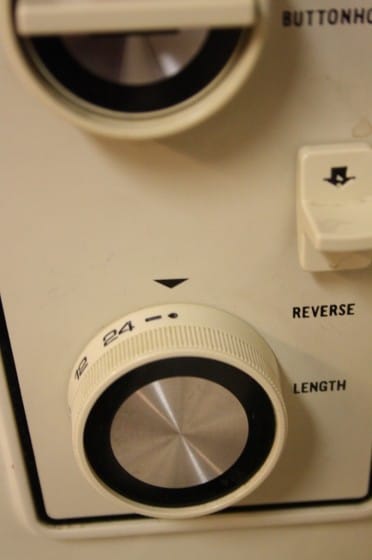
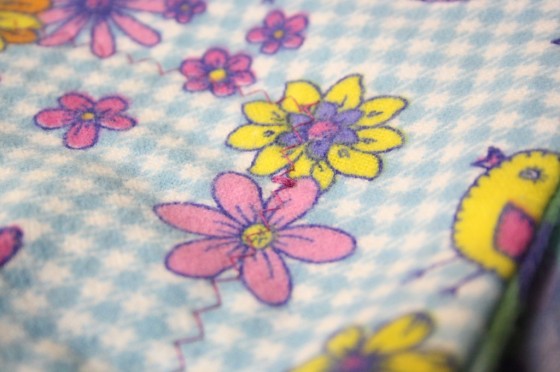
When you’re doing this, your fabric won’t move at all. It will stay in one place while your needle moves right and left, leaving a nice little locked stitch that looks like this: (see the tidy knot of thread where the pink and yellow flowers overlap?)
Check for pins!
Once you’ve zig-zagged all the way around the edge of your baby blanket, check to make sure you’ve removed all of your pins, trim any loose threads, and stand back and admire your work!
Congratulations! You’re done!
Well, almost…
Remember that strip that I told you to hang onto?
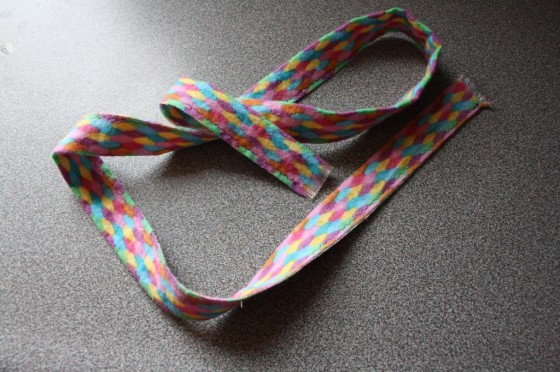
Folding and rolling your receiving blanket
I turn it into a long “tie” so I can roll the blanket up so it presents nicely when giving as a gift.
I fold the long strip in half, and stitch it closed with a zig-zag.
Then I roll the blanket up, folding it in a way that a bit of the reverse fabric peeks out the top (don’t ask me how – I just mess around until I get it right). And then I tie that long strip around the blanket, finishing with a knot or bow, to hold it all in place.
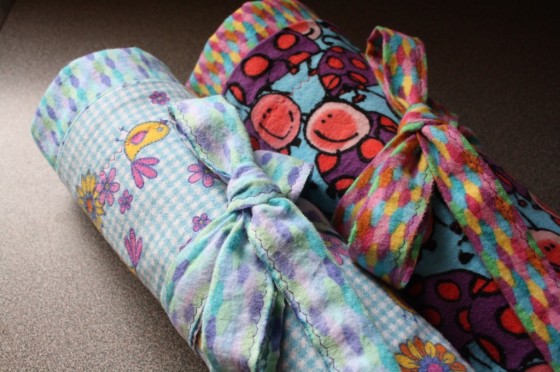
Aren’t they pretty?
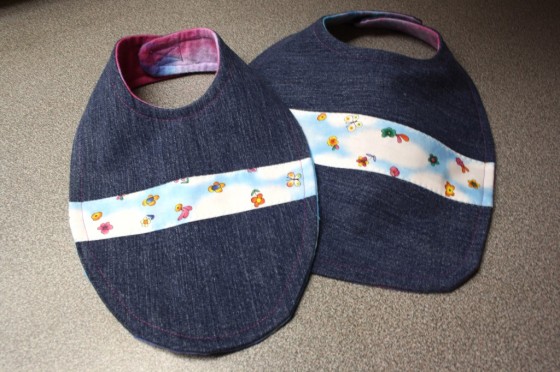
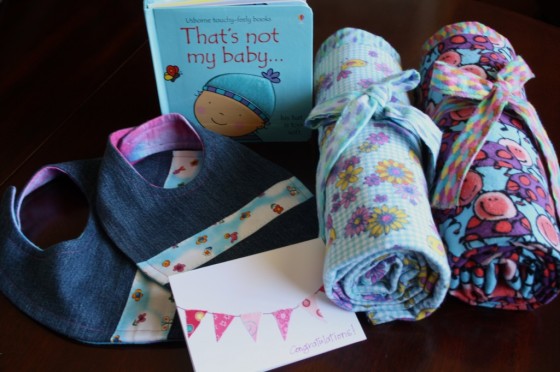
When I’m giving these homemade blankets as a baby shower gift, I usually include a couple of my repurposed denim bibs,
and a baby book, and a homemade card.
You may also like:
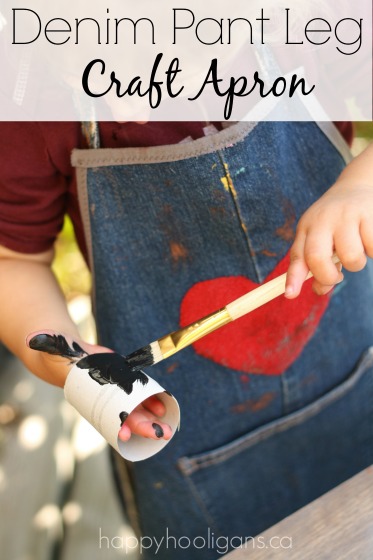
How to Make a Kids Craft Apron from Your Old Jeans
How to Make a Durable Denim Bib from Your Old Jeans

Jackie is a mom, wife, home daycare provider, and the creative spirit behind Happy Hooligans. She specializes in kids’ crafts and activities, easy recipes, and parenting. She began blogging in 2011, and today, Happy Hooligans inspires more than 2 million parents, caregivers and Early Years Professionals all over the globe.


Brenda
Very cute. I might even be able to sew something like this. And I see you added an Usborne Book book. My favorite.
happyhooligans
Brenda! You can totally do this! Send me pics if you make one! xo
learn.grow.imagine.create
Love this idea! Cant wait to pick out some fabric and try this
happyhooligans
Yay! Have fun making yours, Leah! I’d love to see what yours looks like! Feel free to link up on my facebook page!
learn.grow.imagine.create
Ok, I will. That will also motivate me to complete the project! lol
Debbye Parker-Kinman
Great tutorial! I love and appreciate the details, and WOW, what adorable blankets! Makes me wanna break out my dusty old sewing machine! Actually my goal for the summer (amongst others) is to make blankets for a non profit close to my heart. Thank you for the great and simple idea! 🙂
happyhooligans
How nice to think that you’ll be making these for such a good cause, Debbye! So glad that my little (or not so little!) blankets have inspired you! 🙂
Amanda @ Dirt and Boogers
These are so cute! I really don’t like to sew and I usually end up cussing and wanting to throw my machine out the window…but I think I can make these. Maybe I’ll try one evening with a glass of wine (or two). 🙂
happyhooligans
Well, see that’s the problem, Amanda… you’re supposed to wait until you’re FINISHED sewing before you get into the wine! LOL
Patricia Torres
Oh my.. thats such a fabulous idea.. Im no good at sewing at all.. But you seem to make it look simple and easy.. Thanks for linking into Made with Love..
happyhooligans
They really ARE easy, Patricia! Glad you like them. 🙂
Nikki McRay
I have made these for over 9 years, when my granddaughter had to go day care. she need a blanket big enough to cover her when transferring back and forth , she liked them so much ,that I made them baby
shower presents for my co workers,
Linda Wetzel
Love it BUT…..the top picture looks like it has a two inch border around it???
thanks Linda
happyhooligans
That’s just the reverse side of the blanket showing, Linda. When I give them as a gift, I always roll them up in a way that you can see the reverse fabric contrasting with the front fabric. Sorry for the confusion. 🙂
Joan
Looking forward to making one of these for my new Grand daughter that will be arriving soon.
Just wondering when you made your zig zag stitch how many inches did you leave from the edge of the material. Was this to secure the material so it didn’t bunch up later? I also must have an older machine then you because I don’t have a stop on my zig zag so I just go over it a few times to secure it.
happyhooligans
I usually do my zig-zag stitching about 2.5 to 3 inches in. I never really measure, and yes, it’s to keep it from bunching when you wash it, and also to add a decorative touch. I like to use a contrasting thread. My machine is really old too, but I just turn the stitch length dial to the dot so the needle doesn’t move forward or backward, but I’ve also just done the zig zag back and forth a few times to secure the stitching. Glad you liked these, Joan. They’re my favourite gift to give a new baby. Did you see the denim bibs I make too? They’re wonderful and really easy to make. I use our old jeans and tee shirts to make those – they’re so stain resistant and durable. They’re quite large though, so maybe when you’re grand-daughter is a toddler. Congratulations on the upcoming new addition to your family! So exciting!
Joan
I also have two Grandsons and love your denim bibs, I have made others but these look so easy and are so cute. I just purchased a new pair of jeans which are really long and need to hem them so I think I will use this denim.
kim
Hi, when you say meters is that the same thing as a yard of fabric, sorry I’ve just never heard this measurement before thank you!
happyhooligans
Yes, they’re close enough to be interchangeable for this project, Kim.
June Griepp
A meter is 39 inches. A yard is 36 inches. The metric system is used in Canada and Europe. We Americans are the odd balls who use feet, yards and miles.
Virginia S Eaves
A meter is the common unit of measure that is used all over the world except for the United States, Myanmar and Liberia. We are so backward for not changing when Ben Franklin tried to get us to do it.. A yard is 3 feet or 36 inches, while a meter is about 39 inches or 100 centimeters.
Jeri
Ohhhhh how i wish my sewing machine didnt break 🙁 someday soon!
Joan
I did make this reversible receiving blanket and two blue jean bibs with the same strip of material on each of the blue jean bibs as the reversible blanket. I also make a burp cloth. This was all made for my new Granddaughter. It was easy and fun, Thanks for posting it! Joan
happyhooligans
Wonderful, Joan! I love co-ordinating the bibs and blankets when giving them as gifts too. Congratulations on your new granddaughter!
Joan
My daughter was so excited to receive the reversible receiving blanket and bibs. When she used the blue jean bib she said it was so nice and soft to wipe the babies face using the soft flannel from the strip I used, of the same material from the receiving blanket. It seemed to be in just the right spot. I also used the flannel piece for the back of the bibs.
Thanks, we are having so much fun having a baby Granddaughter. I will be making more of these. Thanks again, Joan
Sheila Kobli
Can you make a suggestion to a website for your cute flannel material? I am having such a difficult time anything cute for a baby. Thank you, Sheila
happyhooligans
I really don’t know of any fabric websites, Sheila. I’m not sure where you are, but I’m in Canada, and I always find the cutest fabrics at Fabricland (a chain of fabric distributors). If you’re in the U.S., I know people rave about Joanne’s Fabrics.
Sheila Ubik Kobli
I am in the US and did go to Joann fabrics, they were running a great sale and picked up some cute prints! Can’t wait to get started. Thanks
happyhooligans
Oh good! I’m glad you found some great fabric on sale, Sheila! Happy sewing!
Katie
Made 4 of these today for my cousin. This we’ll certainly be part of every baby shower gift I give from now on!
happyhooligans
Yay! Yes, isn’t this just the best? The blankets are my favourite go-to gift whenever anyone’s having a baby! So glad you’re happy with yours, Katie!
Marsha Siperek
I just made 2 of the reversible blankets and they are really cute! I can’t wait till the baby shower to give them! Thanks!
Amber S.
My sweet little nephew who is 5 was just diagnosed with a stage 4 brain tumor. I have been looking for a simple, light weight blanket to send him for his chemo treatments and with a few adjustments in size this one will be perfect! Thank you for sharing it online.
happyhooligans
You’re so welcome, Amber. Prayers and positive thoughts on their way to you and your nephew. x
Betty Smith
Betty Smith
Amber S;. I make single fleece blankets, 50by 60, crochet around edges .Have senior friends that love these to take toChemo, doctor visits, etc. Have cute designs for children. Will send you one if you will send address. Also make flannel receiving blankets that are 45by45 if you need lighter. My girls and I started this as mission so no charge.
phyllis hicks
love stuff like this thanks for the ideals
Connie Belen
I made a flannel rag quilt for my friend’s new baby and was wondering what to do with the left over material. Made 2 of these adorable receiving blankets and I love love love how you tied them up. They look wonderful and match her crib quilt. Just wondering since it is double sided, do you have any trouble with them bunching up? Was thinking about putting a few tack downs in there. What do you think? And thanks for the ideas!!
happyhooligans
Hi Connie! I’m so glad you liked this project! I’m happy to say I’ve had no problems at all with bunching. I just do that top-stiched seam all around the edge (an inch or so in), and everything stays in place nicely.
Vicky Merrifield
I have made receiving blankets for all 6 of my grandchildren, 5 to 8 for each one, but all single sided-. When I first saw your tutorial I tucked the information away because I didn’t have any newbies to make them for but now I have two grandson coming (one in November and one in January) so the double-sided will be perfect! The photographs you posted are very eye-catching and your tutorial should help anyone new to sewing. Love following you!
happyhooligans
Thanks, Vicky! I’m glad you’ll be making them! Congratulations on the upcoming arrival of two more grand-babies!
Anna parrott
Hi is it flannel both sides please
happyhooligans
Yes, Anna. The front and back are made from co-ordinating pieces of fabric. 🙂
Kristen Capogna
Bought fabric today to make 2!
Robbie
I have 5 great granddaughters ranging in age from 2-1/2 to 8. I like to make my Christmas presents so I will be checking out the jeans at Goodwill. I will be embroidering on the hearts “Nana loves you”. We have two new great grandbabies due in 2015. Part of the shower gifts will be the bibs and oversized blankets. These are extremely special. Now, for my problem, I have a 9 year old great grandson. Do you have any ideas of things that can be created for him?
happyhooligans
Hi Robbie! So glad you’ll be using some of my ideas for your grandchildren! I don’t have any posts of my own that would suit a 9 year old boy, but here’s a post from “How Does She” that you might find some inspiration in: http://www.howdoesshe.com/19-very-cool-diy-gift-ideas-for-teenage-boys/
Robbie
Sorry typo in previous message. I have 6 great granddaughters.
tammy march
Can’t wait to make this for my daughters teacher who is expecting her first and I just got a new sewing machine for christmas from my husband!
Agnes. Porteous
Looking for ideas to use. Up lots of old Demi Jean all colors and weight of Demi. Look to make our new grand child items . Also ideas for other members of family we have 4 girls and 3 boys al kids are in 20 -30 Thanks
happyhooligans
Do you mean “Denim”, Agnes? I have two projects that make great use of old denim jeans: https://happyhooligans.ca/repurposed-denim-bibs/ and https://happyhooligans.ca/repurposed-demin-aprons/.
Sheils
Thank you for these ever so simple to follow instructions. Well written & illustrated. I normally don’t enjoy sewing at all but I enjoyed making this beautiful blanket for my great nephew (not born yet).
I love the fabrics patterns you have used too. I’m in Australia and haven’t seen any fun fabrics like you have used but I will keep an eye out now that you’ve made it so easy to make this beautiful blanket.
Sheils
Erin
I’m having trouble with the flannel pieces not matching up when I get to the corner – so one side is longer than the other. .. super annoying! Any suggestions? Is it the tension on the teeth? Thanks for your help!!
happyhooligans
I pin it to help keep the layers in place after cutting them. Then, when I’m sewing, I pinch the fabric together behind the needle, and I pinch the fabric in front of the needle in order to keep the layers exactly together as they’re feeding through the machine.
Nancy J Hill
I should have sent this note along time ago, but I forgot…. I made two of these blankets, one for a new Mother, i.e., first baby and one for a family whose little guy was born with some critical medical issues. The Mom was a former Michigan State University basketball star and the Dad was from Australia. I found a pretty green & white print (MSU’s colors) and one with Koala bears in trees. They turned out so cute and the recipients were really pleased. I don’t know how to photograph and send a picture to you, but I so enjoyed making them. Thanks for the great idea and clear instructions!
Jackie Currie
Lovely, Nancy! I’m so glad you enjoyed making these blankets and so happy the recipients loved them!
Carolyn
In the last.thirty years, I have made so many of these to give as gifts. In fact I would watch for flannel to go on sale and then I would buy enough to make a good many and all of them doubled.. I just always bought even number of yards. Mine were made 36 x 36. I have received many compliments. Before my husband
retired, many times, he would come in and ask me if I had any of the little baby blankets, that the office was giving some mother to be a baby shower. I was always glad that I had some ready to go.
Judy
Super Bowl game day for my husband and a sewing day for me. I made 5 of these lovely blankets and can’t wait to gift them. Great idea, lovely wrapping and gifting instructions. Now I will do up some for charity. Thanks for the ideas! Judy, Vancouver Canada
Jackie Currie
Wow! You were busy! It sounds like a dream day. 🙂 I’m so glad you loved making these blankets, Judy! This is one of my all-time favourite projects!
Laura L Nelson
Are the two layers adhered in some way to keep them from separating?
thanks!
Jackie Currie
No, they don’t separate though, Laura.
Jessica
What is the seam allowance you use, when the flannels are right sides together (before you turn inside out)?
Jackie Currie
Hi Jessica. I always use a 1/4 inch seam allowance. I thought I would’ve mentioned that in the post, but maybe I forgot. I’ll check and add it in now. Thanks!