This Paper Plate Bird Craft is so cute and easy. It’s a great spring or Easter craft for kids to make!
Spring is in the air, and so my toddlers and preschoolers have been creating lots of Spring crafts to hurry it along! Today I’m sharing the super-cute paper plate bird craft that we made today. It’s one of many in our A-Z paper plate crafts collection. Did you see the Paper Plate Robins we made last year? Well the birds that the hooligans made today are a more colourful and eclectic version of those robins.

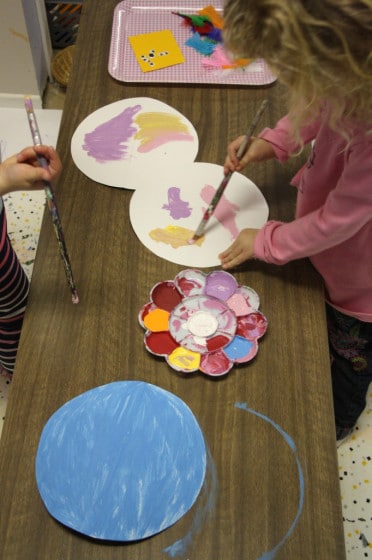
Truth be told, we didn’t actually use paper plates for these birds because I didn’t have enough plates to go around. I simply cut circles (I traced a child’s plate) out of white cardboard. A cereal box would to the trick too.

I have to say that I’m just in love with these little birdies! What a fun burst of colour as we await Spring!
For our paper plate bird craft, you’ll need:

For your convenience, I’m including Amazon Affiliate links in this post.
- White 9″ Paper Plates – 100 Count
 (or cardboard circle)
 - googly eyes
- Cardstock for beak
- thin strips of coloured construction paper
- craft feathers (you could also use crumpled squares of tissue paper – see our Rockin’ Robin Craft)
- paint
- glue
To make our paper plate birds:
We started by folding our paper plates in half.
I set out a pallet of acrylic paints in assorted colours, and the hooligans painted their birds however they wished. A quick blast with the hair dryer had them moving onto the next step in no time. I’ve said it before, and I’ll say it again. If you have a spare hair dryer, move it into your craft room for speeding up the drying process when you’re crafting with your little ones.
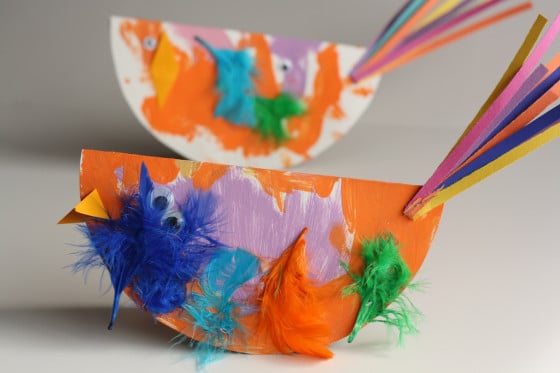
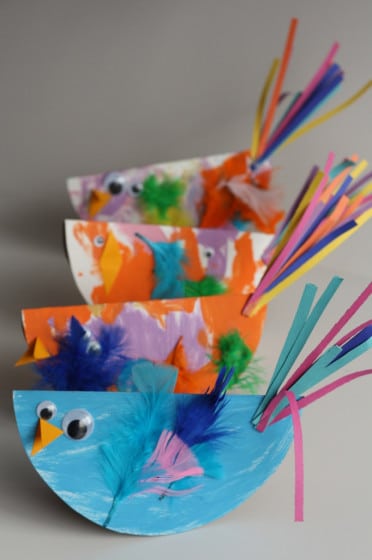
Next, we glued on the feathers, eyes and the beak.
For the tail, I grabbed several strips of the construction paper and I folded them in half, kind of fanning the strips out a bit, and we stapled those to the tail end of the birds.
Fold your bird back in half, and you’re done!
If your bird won’t stay folded, simply tape a piece of yarn or string to the inside, holding both halves of the plate together, while leaving about an inch and a half gap between them.
Now when you place your bird on a flat surface, you can “rock” it.
How cute and how easy was that?
And now check out these rocking bunnies by Red Ted Art!
BRING ON SPRING!
More bird crafts for kids:
Follow the Hooligans on Facebook

Jackie is a mom, wife, home daycare provider, and the creative spirit behind Happy Hooligans. She specializes in kids’ crafts and activities, easy recipes, and parenting. She began blogging in 2011, and today, Happy Hooligans inspires more than 2 million parents, caregivers and Early Years Professionals all over the globe.


Arlee
Adorable!!!! We will definitely be makin’ these!!
happyhooligans
Have fun, Arlee! You’ll have to let us know how yours turn out!
Melissa K.
Snow day project tomorrow! These are so cute.
Kristina @ SchoolTimeSnippets
Cutest birds ever!
happyhooligans
Hehe! Thanks, Kristina!
Sarah @ Frugal Fun for Boys
Those birds are so adorable, plus easy for little ones to do most of the work themselves. LOVE it!
happyhooligans
Glad you liked them, Sarah. I liked this one too, for how easy it was for the little ones to do!
Rebekah @ The Golden Gleam
OHHH, I adore these. I think I know what our craft will be this weekend. =)
reshamad
These look Adorable! Thanks for the post, we are going to try these out.
-Reshama
http://www.stackingbooks.com
Allison
Adorable! I’m featuring these on The Sunday Showcase. By the way, you take amazing photos. Your post are always gorgeous no matter what the activity.
happyhooligans
Yay! So glad you loved them, Allison! And thank you for your kind words. You just made my day. 🙂
Cindy deRosier
I’m the Editorial Assistant for Fun Family Crafts and I wanted to let you know that we have featured your bird project! You can see it here:
http://funfamilycrafts.com/paper-plate-birds/
If you have other kid friendly crafts, we’d love it if you would submit them. If you would like to display a featured button on your site, you can grab one from the right side bar of your post above. Thanks for a wonderful project idea!
happyhooligans
Thanks so much for the feature, Cindy!
Marie
I have just done these with a 4 year old and an 18 month old in my daycare they had loads of fun!
Jen
Hi Happy Hooligans! Is there a way to pin specific activities. I follow the page but would love to pin activities I can use for my OT kiddos! TIA
happyhooligans
When you hover over each photo, you should see a “P”, Jen. That’s the “pin it” button. You can click that to pin the post. There is also a row of social media buttons at the bottom of each post. One is a pin-it button. Alternatively, if you install the pin-it button in your tool bar, you can use that as well.
Mom 4 a Difference
So cute and incredibly colorful. I know my little guy will love this! Can’t wait to try it. One question though – where did you get the colorful cafeteria-like tray to work off of? I keep seeing them on blogs but can’t seem to find them. Thanks!
happyhooligans
I’ve had that one for years and years, so I can’t remember where I got it, but our Dollar stores here carry lots of colourful plastic trays.
Mom 4 a Difference
Thanks! I’ll check our Dollar Tree to see if they have them.
Karen W
Cute! Someone just shared this on Facebook and I had to stop by and Pin it. May just be making these when we get to our Q:Quail (Birds) unit.
Gayle Brecke
These are adorable and I can see me using them with the creation story in my toddler class.
priscila escobar
que lindo, me encantó. So pretty, it’s beautiful
Lisa
I was just wondering what the other side looks like? did you decorate both sides?
happyhooligans
We did the one side, you certainly could do both though.
Soma Satılık Ev
Great activity! Thank you