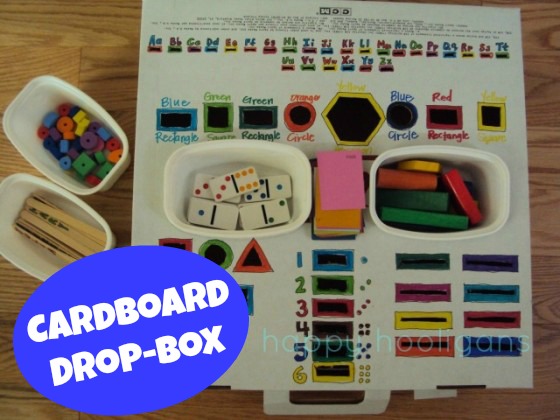
Turn an ordinary cardboard box into a fine motor drop box for toddlers and preschoolers. This is a great homemade activity for teaching kids colours, numbers, letters, shapes, and it’s a fun way for strengthening fine , motor skills.
Of all the homemade toys and activities I’ve made for my daycare, our fine motor drop box, made from a cardboard box, is one of my all-time favourites!
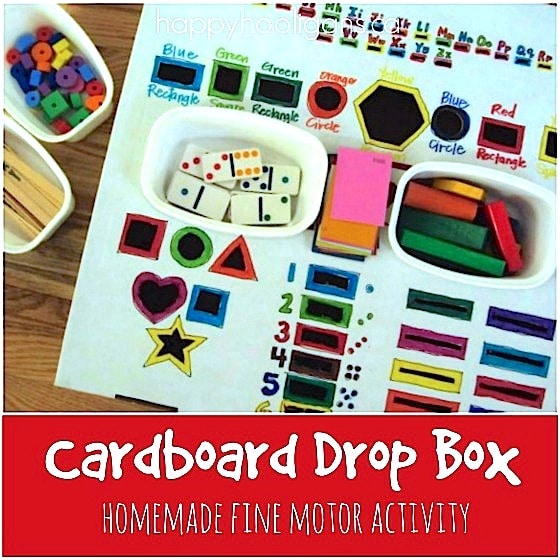
A fine-motor dropbox provides so many learning opportunities in one activity. There’s shape-matching, colour-matching, number and letter recognition, and it’s a great activity for strengthening fine-motor skills, cognitive skills and co-ordination.
A drop box ls a wonderful homemade learning tool for toddlers to hone their fine motor skills with, and wonderful for preschoolers who are learning their letters and numbers before starting school.
Kids love an activity that involves dropping things into things, so this dropbox gets played with almost every day here in my home daycare. Sometimes, one child can be seen carefully matching the items up and dropping them into the box, but more often, several children gather around the box and work along-side each other.
A small box like a shoebox would be a fine size if one child will be playing with the dropbox, but because I have several children here every day, I used a skate box. It’s perfect for 3 or 4 children to gather around.
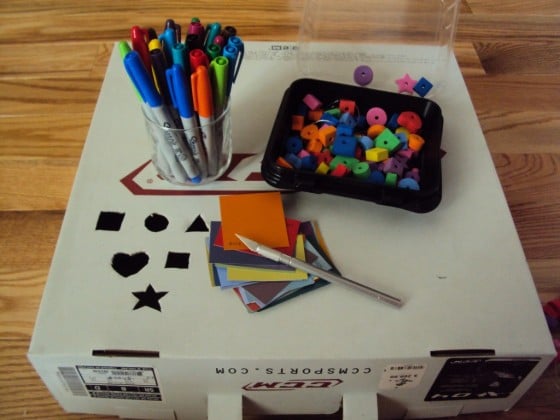
Supplies:
- a cardboard box (this one held a pair of hockey skates)
- Sharpie Markers

- X-ACTO craft knife
- chunky foam shapes
- wooden blocks
- dominoes
- craft sticks
- paint colour swatches ( grab a handful at the paint or hardware store)
Instructions:
Our drop box is made up of several learning activities. There’s shape-matching, colour matching, letter matching, number matching, and to make it interesting, I used materials of all different sizes for the drop-ins.
Shape matching activity; To make my dropbox, I started by tracing the foam shapes on the lid of the box, and I cut the shapes out with a craft knife. Then, I outlined the cut-outs with the Sharpies that matched the colours of the shaped blocks.
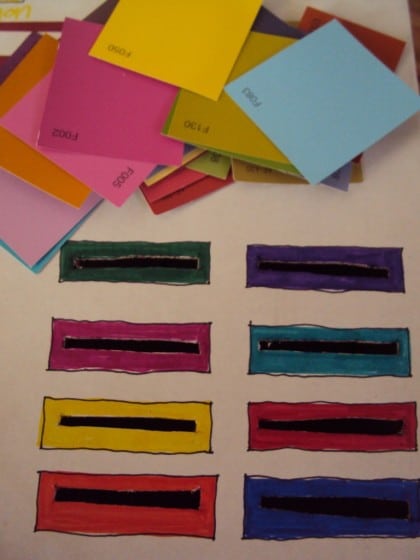
Colour matching activity: Paint samples from the paint store are wonderful for kids to learn their colours with. For the paint swatches, I cut 8 slots in the box, and outlined each one with a different colour of marker. The paint chips are various shades of each colour, so the Hooligans have to decide which colour family each paint sample belongs to before dropping it into the box.
Letter matching: Next, using Sharpie markers, I drew upper and lower case letters on the craft sticks, and made a small slit in the box for each one. On the backs of the sticks, I drew coloured circles, squares and triangles, for the youngest hooligans who haven’t yet learned their letters.

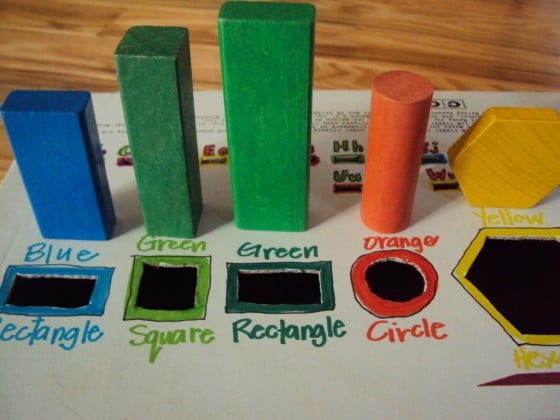
Shape matching activity: I chose several coloured wooden blocks from our block bucket, and I drew corresponding shapes on the box. Like the other drop-slots, I outlined these holes in colours that matched the blocks. I also wrote the colours and names of the shapes above and below the holes.
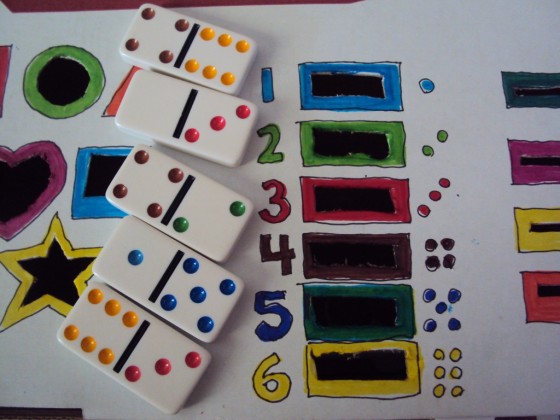
Number matching activity; for the number matching element of our dropbox, we use dominoes. Kids have to count the dots on the dominoes and match them with the corresponding hole.
Containers to hold everything:
When I was finished, I cut 2 holes to sink a couple of plastic containers into. These hold some of the materials while the kids are using the dropbox.
Skills Development:
What skills do children strengthen when playing with a dropbox like this?
- fine motor skills
- spacial awareness
- colour recognition
- number recognition
- shape recognition
- letter recognition
- problem solving
- critical thinking
Storage everything inside!
When you’re ready to pack your dropbox away, you can store the containers and drop-ins inside the box. 🙂
I had a lot of fun making our dropbox and the kids love playing with it. I hope you’ll try one at your house. It’s a wonderful homemade toy to help young children learn and develop through play.
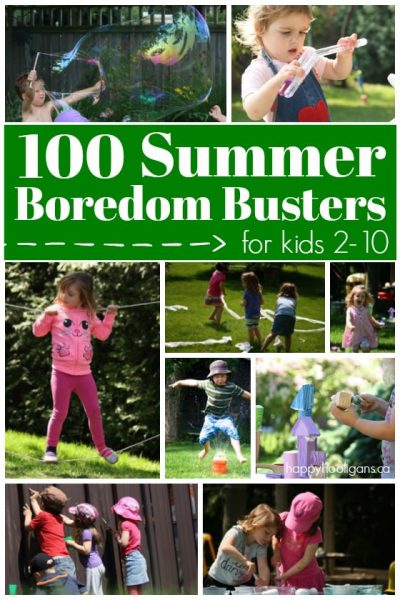
Boredom Busters for Kids!
Print off our checklist of 100 Fun Things for Kids to Do at Home. Stick it on your fridge, and they’ll never be bored again!
You may also like:

Jackie is a mom, wife, home daycare provider, and the creative spirit behind Happy Hooligans. She specializes in kids’ crafts and activities, easy recipes, and parenting. She began blogging in 2011, and today, Happy Hooligans inspires more than 2 million parents, caregivers and Early Years Professionals all over the globe.


Angelique Felix
What a great work you have doe for your hooligans 😉 I will pin this and do it myself also. Thanks for the inspiration!!
happyhooligans
Thanks for pinning, Angelique! Have fun with yours!!
cathy@pre-schoolplay
Oh nooooo! I also saw this post and wanted one, but managed to convince myself with all the other things I wanted to make maybe I should leave this one. But now I’ve seen yours I am so jealous and will have to make one:))
Make and Play
Such a great idea! Looks like a very busy box that can provide hours of fun and learning!!! Thanx for sharing!
Deborah Stewart
Ok – That is AWESOME! We will so make this for our class too! – Well, when I get the time but I love it!
happyhooligans
Oh, I know!! If only we could figure out a way to give up sleeping…just think of all the things we could make! I’m so glad you liked it, Deborah! Thanks so much for sharing the link!! 🙂
Deborah Stewart
You are welcome;) Thanks for sharing so many fun ideas! It has been a pleasure to follow you.
Emily Dixon
What a cute Idea!!
Amie White
Super cute! Looks like it could definitely work for my own 5 year old at home, as well as my kindergarteners, as a single person center. Love it! Gonna get started on mine asap! Thanks!
happyhooligans
Thanks, Amie! Have fun making yours! Hope your little people love it!
Jamie McCann Peabody
Wonderful possibilities for Circle time too! I can see thematic boxes too… I don’t know how you and Deborah and a few others find time to Blog but I sure APPRECIATE it!
happyhooligans
Great ideas, Jamie!! As far as finding the time….this could be interesting. I set up my blog a few weeks ago, while my daycare was closed for the summer. The Hooligans return on Tuesday, so I have a feeling I’m not going to be posting nearly as often as I have been this past couple of weeks. lol Thanks for stopping by, and for taking the time to drop me a line. 🙂
Bethany Haid
This is the best one I’ve seen (and the only one I pinned!)
happyhooligans
Thanks Bethany! And thanks so much for pinning!
strawberryswan
I LOVE this idea! I may even use clear contact paper to cover it and make it last longer.
happyhooligans
Glad you liked it! The contact paper is a great idea!
Kimberly Schrant- Gale
I have to say that this is absolutely awesome!!! I have some little ones that would definitely benefit from this!!! Thanks for sharing!!!
happyhooligans
You are welcome, Kimberly! It was a lot of fun to put together! Hope you and your little ones have fun with yours!
Rebekah @ The Golden Gleam
That is impressive! I get so frustrated working with cardboard. I think I need to invest in a good box cutter.
happyhooligans
Thanks, Rebekah! Yes, a good box cutter is the ticket!
Valerie @ glitteringmuffins.com
Love it! Now I need to make one, dang it! Thanks for the extra work Jackie 😉 (Just kidding of course)
Eve Margolis
Are you kidding me?!!! I can’t believe how creative you are! I am a fairly new SAHM and thought of myself as creative, but I will definitely be referring to your fantastic web of ideas for kid (and mom) fun!
jeannine: waddleeahchaa.com
Love the hours of fun, hands-on learning this drop box inspires! Pinning and tweeting as a great back to school for little ones!
Lisa
Love this! Pinning!
Andrea
I don’t know if you already mentioned this but what were the containers put in the box for? To catch the items?
happyhooligans
Just to store the bits in while they’re playing, Andrea.
Katherine Collmer
I love this activity! Will share!
REKHA
GREAT IDEAS!!!