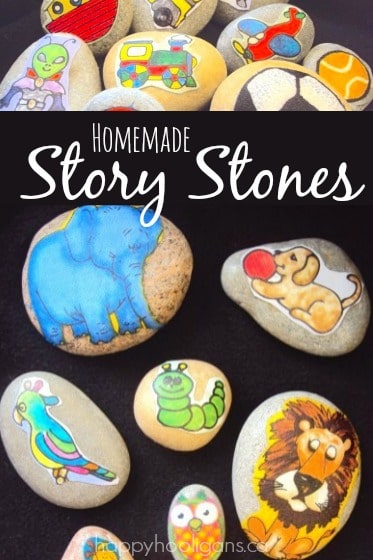
Learn how to make homemade story stones and how to use them as a learning tool with your kids at home or in the classroom.
Homemade story stones are a fun addition to any playroom or classroom. They’re make great story-telling prompts and they spark creativity and imagination. Today, I’m going to explain them in detail a little more, and show you how to make a set of story stones that your children will get years of enjoyment out of.
When I first learned about story stones, I knew right away that I needed to make some homemade set of my own because A) the crafter in me loves making homemade toys, and B) the hooligans LOVE playing with stones. We have quite a large collection of stones and rocks of all sizes here at my home daycare. You can see how we play with our some of our stones here.
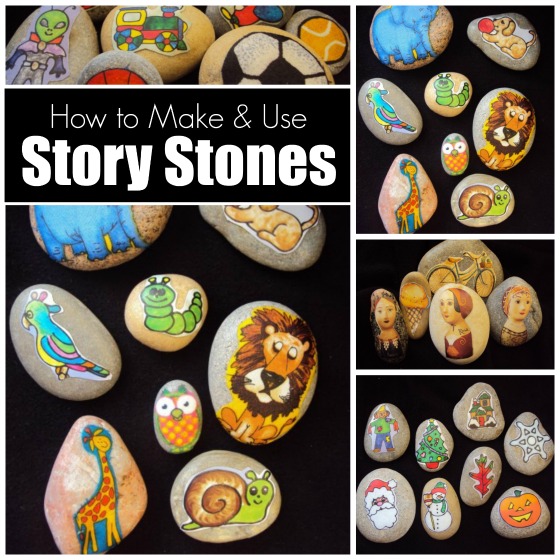
Recently, I made a this large set of story stones for my daycare.
I had such a fun time making them, and the hooligans are enjoying them in all kinds of ways.
Let me tell you what story stones are, how you can use them in a playful and educational way, and how easy they are to make.
For your convenience, this post contains affiliate links. (As an Amazon Associate I earn from qualifying purchases)
What ARE story stones?
Story stones are smooth, flat stones that you can find at the beach or even at a craft store (Amazon has quite an assortment here). Each stone has a picture of a character or animal or object on it. You can make a story stone in a number of ways:
- by painting a picture on the stone
- with stickers
- drawing on your stones with permanent marker
- with magazine cut-outs and fabric scraps
We used magazine cut-outs and fabric scraps. I’ll show you how in a minute.
How do you use story stones for play?
Story stones can be used in many ways:
You can use them as story-telling aides: the children choose a stone from the basket, and start a story based on the picture on the stone that they’ve chosen. Another stone is drawn from the basket, and the story continues, incorporating this next picture into it. One child can be telling this story, or you can pass the basket around at circle time, so that each child draws a stone, and adds another sentence to the story.
Story stones can be used for creative play: The hooligans often use the story stones at whatever centre they’re playing at. Our story stones are often used as:
- characters in the dollhouse
- animals at our farm cemter
- in conjunction with our building blocks
- as food in the play kitchen
Sorting and grouping activities: The hooligans love to sort our story stones. The kids will pile up all of the people stones, and then they’ll find the animals, and the food stones. The holiday stones go into another pile, and so on. These sorting and organizing activities help to develop cognitive skills.
The kids also like to line the stones up in a long row or to make a large circle on the floor.
There’s no right or wrong way to play with the stones. They’re open-ended, and they foster creativity and critical thinking.
We LOVE them.
Now that you now WHAT story stones are and how to play with them, let’s move on to making them!

As I said earlier, there are a number of ways to make story stones, but this is how I made ours.
How to Make Story Stones:
First I raided my fabric stash for cottons and flannels that had animal prints on them. I cut out a few animal shapes, and then i moved on to a stack of magazines and old craft books that I’d picked up at a second hand shop a few years back. The craft books were fabulous.


The books were intended for a stained glass-painting type of craft. Of course, being in a second hand shop, the paints didn’t come with them. I just thought the pictures might come in handy one day, so I bought them, and tucked them away for a rainy day.
The pages were heavier in weight than a regular magazine, and the colours were vibrant. The pictures in the book were just perfect for my project. Hello, rainy day!


To make your story stones, put a puddle of Mod Podge![]() on a stone, and then place the cut-out in the puddle, and use your fingers to smooth out any air bubbles.
on a stone, and then place the cut-out in the puddle, and use your fingers to smooth out any air bubbles.
With a sponge brush, smooth and dab a little modge-podge over the cut-out, pressing around the edges with your fingers, to get a good seal between the paper and the stone.
If you’re unfamiliar with Mod Podge, oh my… you need to get some. It’s like liquid gold for crafters. You can use it in so many ways!
Most commonly, it’s used for decoupage.
If you’re unfamiliar with the technique, you can find out what decoupage is here.
Check out this amazing round up of Mod Podge crafts for kids over at, where else… Mod Podge Rocks.

The quilt fabric was the easiest to work with because the material was thin and flimsy, and molded to the rock easily. The magazine pictures worked well too, because they were thin.
The craft book cut-outs were quite a bit thicker (similar to glossy card-stock), and required more pressing and smoothing, but they turned out great!

If you don’t want to go to the trouble of using mod podge to make your story stones, you could simply apply assorted stickers to your stones, and then give them a coat of varnish for protection.
Whether you’re using mod podge or craft varnish, be sure to let your stones dry thoroughly before tossing them all into a basket for storing. If they’re not completely dry, they could stick together.
I let mine dry for a couple of days until they no longer felt tacky.

Story stones provide a super opportunity for imaginative play, and there’s some great sensory stuff going on too: the colours are vibrant, they’re cool to the touch, and for me there’s something soothing about the sound of stones clacking together as you play with them.
Aren’t they cute?
I’m so pleased with the way they turned out.

Get 3-5 Playful Preschool e-Book!
25+preschool activities by 25 bloggers, 10 printables, 50 links to activities not featured in the book all for $8.99!

Follow the Hooligans on Facebook

Jackie is a mom, wife, home daycare provider, and the creative spirit behind Happy Hooligans. She specializes in kids’ crafts and activities, easy recipes, and parenting. She began blogging in 2011, and today, Happy Hooligans inspires more than 2 million parents, caregivers and Early Years Professionals all over the globe.


cathy@pre-schoolplay
Wow yours look fantastic – I wonder which ones will be the hooligan’s favourites! Ahhh you made balls, I realised the other day I have a little one that is totally obsessed with balls and I forgot to do a ball!!
happyhooligans
Thanks Cathy! I think yours are fantastic! Once the Hooligans are back, I plan to do some photo ones like you did. Love the idea of making them personalized stones!
Sarah
These are so beautiful!!! I adore them!
happyhooligans
Thanks so much, Sarah!
jennoreilly
Wow these are great, going to be collecting some rocks on our walk tomorrow with the kids just so we can make these. Thanks!
happyhooligans
Hi Jenn!! Thanks! You’re going to love making them as much as your kids like playing with them! Good to see you here! 🙂
Wendy Young, LMSW, BCD
I HEART this idea! My kids aren’t so little anymore…but I’m going to tweak this for another purpose. When I get a moment to do it, I’ll be sure to link back to you if I blog about it…
Wendy @Kidlutions
happyhooligans
Please do! I’d love to see what you do with yours!
Messy Kids
I love these story stones! There have been so many variations lately but I think this is my favorite! Now I really want to make some of my own.
happyhooligans
Thank you so much! That’s a huge compliment considering I’ve been absolutely drooling over everyone else’s! 🙂
Therapist San Francisco
These are so cute! What a great idea…I can’t wait to do this with my daughter 😀
Laura Tinetti DeRosier
I love this idea! I have been teaching preschool for 13 years and I am in need of new and creative ideas. Thanks for sharing!
happyhooligans
I have felt the same way before, Laura. It’s so nice to have these blogs and facebook pages to visit for inspiration, and refreshing ideas, Thanks for popping in. 🙂
Noelle
I love this idea!
Lindsey
Very cute. I agree, I love the sound of clicking rocks!
Fun Frugal Mommy
Cute stones!! Now to find flat stones. : ) Thanks for linking to fun frugal friday!!: )
Jacki
Help! I made some of these the other day. After they dried over night I stored them in a little bag, but when the kids took them out the ones that had faced each other stuck together and when they pulled them apart the pictures came off! They were completely dry and not tacky at all when I put them in the bag. How do you store yours? Not sure what to do about it!!
happyhooligans
Uh-oh! I store mine in a sturdy wooden basket. They’re always exposed to air, so I’ve never had any sticking problems. Can you modpodge new pictures over top of the ones that were ruined? I don’t have a lot of experience with Modpodge, but it sounds like more than 24 hours is necessary to truly dry the stones, and you’re probably best to store them in a container that will allow air to circulate over and around the stones. Even in that kind of container (a box, a bowl or a basket), I wouldn’t stack the stones on top of each other until they’re well and truly dry. I’d probably wait several days. I’d be worried if I did any sooner, (esp. in warm, humid, summery weather) that it could happen again.
Hope you get it straightened out, Jacki and that you have fun with them. j.
amy rhodes
Loving the idea! I pinned this ages ago but was looking for an easier alternative that my daughter now 2 and half could do with me. Did not think of using stickers! what a great suggestion! she can use them then I can do the gloss bit. Any ideas on a suitable gloss ?
happyhooligans
Hi, Amy,
You can use the clear acrylic craft sealer, or mod-podge or even a spray varnish. I would let them dry for at least 24 hours before stacking them on top of each other for storing. I had one mom say she placed them in a plastic bag, and they all stuck together, even though they didn’t appear to be tacky any more. I seem to recall mine were tacky for a day or two, and I’ve only ever stored mine in a wicker basket so in the early days, the air was able to circulate around them.
MommyLabs (@MommyLabs)
I love your story stones and we made some for my daughter’s birthday last week to facilitate a storytelling session driven by the kids. It was FUN! Thank you for the inspiration. I mentioned yours’ in my blog post:
http://www.mommy-labs.com/creative-kids/art_craft_projects_kids/how-to-make-story-stones-and-facilitate-group-storytelling-plus-birthday-pics/
happyhooligans
Thanks so much for the mention, Rashmie. It looks like the girls had fun with them! They’re at a great age to participate in making them, and really using their imagination while using them! Love the idea of experimenting with other materials! Happy Belated Birthday to Pari!
Cindy deRosier
I’m the Editorial Assistant for Fun Family Crafts and I wanted to let you know that we have featured your Story Stone project! You can see it here:
http://funfamilycrafts.com/story-stones-2/
If you have other kid friendly crafts, we’d love it if you would submit them. If you would like to display a featured button on your site, you can grab one from the right side bar of your post above. Thanks for a wonderful project idea!
Monica Cantu
Absolutely LOVE the idea! I’ll tweak it a bit, and use plastic bottle caps instead of stones, so that they are easier to carry around. I’m an ESL teacher, and these could be a perfect writing prompt for my students! Thank you for a great project!
Karen Lowrie
Have made these and they are so versatile, big stones with dinosaurs on, some with shapes on in the Maths area, a really lovely idea, and free too!
Clarissa Hooper
This is such a great idea to use stickers to create story stones! I’ve always wanted to make them, and using stickers is just so much easier than painting them!
Katie
I can’t source any rainbow stickers anywhere :0( any ideas please?!
Martine Bracke
Hello
Great idea but where can I buy this kind of flat rock?
Thanks
Martine
happyhooligans
I’m not sure, Martine. I have a beach full of them about 5 minutes from home, so I’ve never had to look for them in stores. A craft store like Michael’s or Hobby Lobby perhaps?
Kay
Just found these in your site. I looked st them thinking you were such a good painter!! I’m half I clicked to read more-only to find I can use magazine pictures!!!! I’m excited I can go this!!!! I certainly can’t paint that good. Brilliant idea. Thanks for sharing. Kay
Amanda Formaro
Hi Jackie! Just wanted to let you know that I featured this post on my Facebook page during April and people loved it. It made it into the top 20 for the month, of which I always do a round up. So today I’ve featured you on my blog as well (link below). Thanks for such an awesome post! http://craftsbyamanda.com/2014/05/great-craft-ideas-may-2014.html
Debs
These are so lovely. Great idea using craft/activities books like that! I still have to make my own. Just letting you know that I’ve featured this idea on this week’s Tuesday Tots in a post full of rock’n great ideas. 😉
happyhooligans
Thank you, Debs!!
Melissa
Love how vivid the picture look! Great for story telling.
Melanie
I wonder if rub ons or temporary tattoos will work on these…
happyhooligans
They might, Melanie. I’m not sure if they adhere to rock, but you could give it a try!
Lacy Robertson
Can this be done with personal photos? My 3 year old has separation anxiety and starts preschool next year so I though making one with a family photo on it that she could keep in her pocket or on her desk might be a good idea. If so what type of paper do you recommend I print on?
bella
Thank you for sharing this info .
You made my day.
Jackie Currie
You’re welcome, Bella!
inaya
Wonderful! Art is an opportunity for storytelling. Reading and art are both wonderful, and they go hand-in-hand!
A wonderful idea is to find your own flat stones at the beach or in a park, and then draw pictures on each one of them.
Surveyfor
Wao an amazing story great idea,