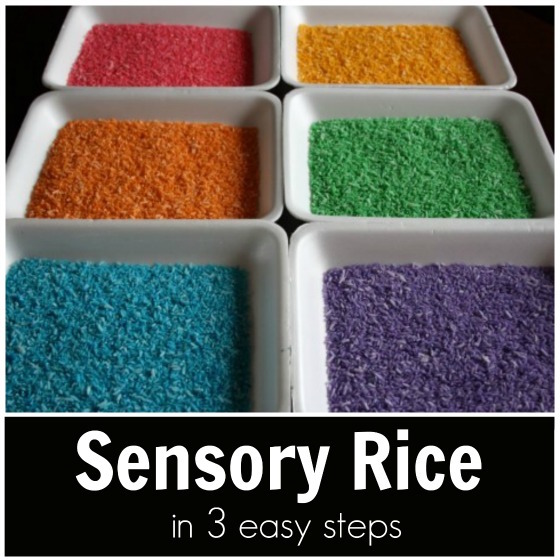
Rainbow Rice! How to dye rice for sensory bins in three easy steps. This easy process for dying rice is mess-free and doesn’t require rubbing alcohol.
The weather is dull and dreary here today, so I thought I’d make some coloured rice for our sensory bins to brighten things up a bit.
You’ve probably seen coloured riced used as a base for sensory bins when you’re scrolling through Pinterest or your favourite kid blogs.
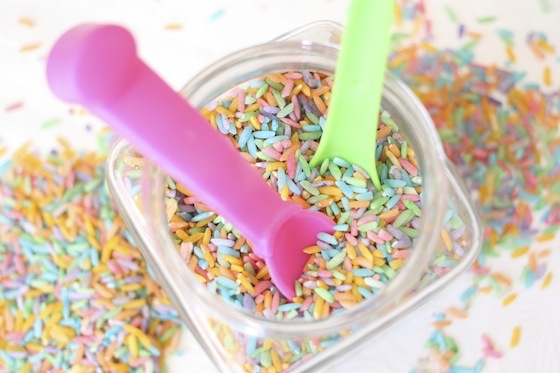
Coloured rice is wonderful for sensory play, discovery bottles, and crafting!
Dye Rice Without Rubbing Alcohol
We used a mess-free process to dye this rice. Hey, who doesn’t love a mess-free project? And unlike many other recipes I’ve found, mine doesn’t call for Rubbing Achohol.
Note: We also use this method to dye dried pasta for our sensory bins.
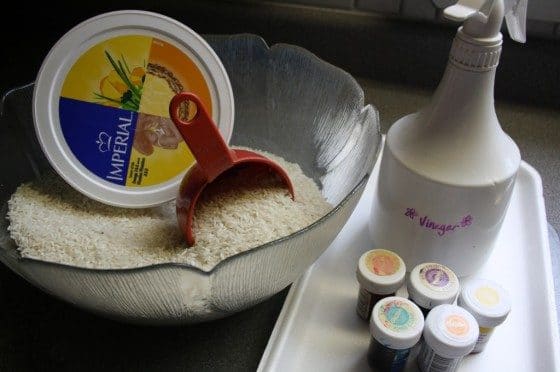
Supplies for Dyeing Rice
- inexpensive, long grain white rice
- vinegar
- food colouring or icing gels
- food storage container with lid
Whenever I make a sensory bin, I always save the base material for future crafts and activities, so I have bags of rice, lentils, popcorn kernels, pasta, oatmeal etc. tucked away that we can re-use for years.
Vinegar, not Rubbing Alcohol
Most recipes for dyeing rice calls for rubbing alcohol to set the food colouring so it doesn’t stain your hands when you’re playing with it.
I decided to use vinegar as a more kid-friendly alternative to the rubbing alcohol.
I’m happy to say that my rice turned out really vibrant, and I’ve run my hands through all the colours while it’s drying, and the colour doesn’t transfer to my hands.
How to Dye Coloured Rice for Sensory Play
For your convenience, I’ve included Amazon Affiliate links for some of the products in this post.
Ingredients for each colour of rice:
- 1 cup of rice
- 1/2 tsp vinegar
- Wilton icing gel (you could also use several drops of liquid food colouring)
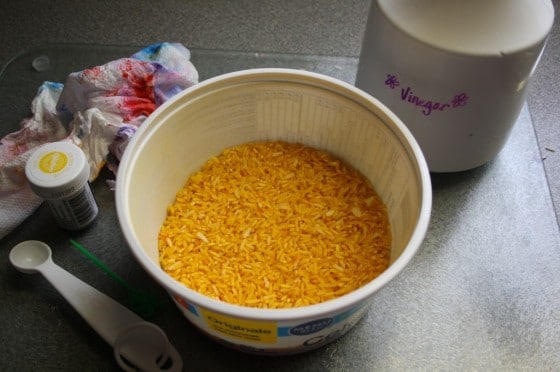
An easy, mess-free alternative to using ziplock bags:
You can mix your rice and food colouring in a ziplock bag, but the thrifty mama in me wanted an easier and less wasteful method for dyeing my rice. I used a clean, empty margarine from our recycle bin, and it worked perfectly.
I just wiped the container out in between batches to remove any colour left behind by the previous batch. There wasn’t evenmuch colour left behind, as the rice absorbed most of it.
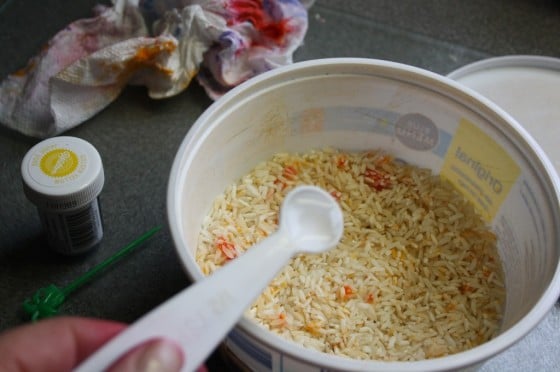
Colouring the rice:
Time needed: 5 minutes
How to Dye Rice
- Add Food Colouring
Pour a cup of rice into the container. With a toothpick, swirl in a dollop of icing gel colour.

- Add Vinegar
Drizzle 1/2 tsp of vinegar over the rice.
- Shake
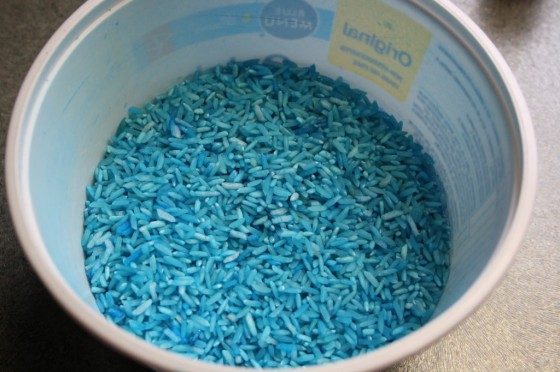
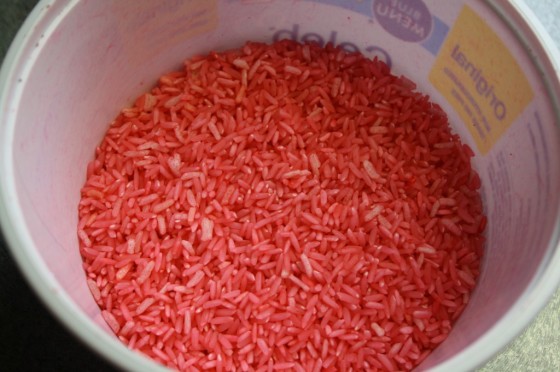
Pop the lid on your container, and shake the heck out of it. Remove lid, and be amazed!
Drying Your Coloured Rice
Spread each batch of coloured rice out on a plate or a baking sheet. I used styrofoam meat trays that had been sterilized in the dishwasher to dry.
Place your rice in the sun or by the fire to dry quickly. It’s not sunny here, but it’s too warm turn the fireplace on, so I’m just going to leave my trays on the dining room table over the weekend.
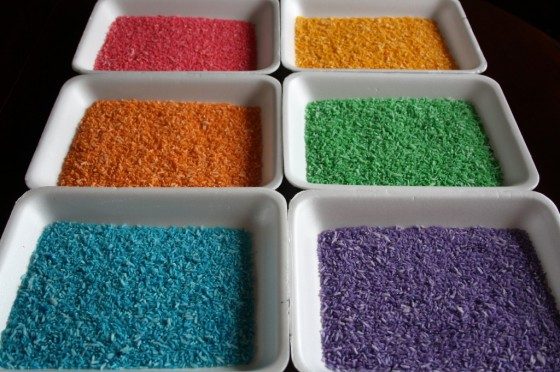
Doesn’t it look fantastic? To see how we played with it, visit our other post: Playing with the Rainbow Rice!


More Sensory Play Activities for Kids:
Get the 3-5 Playful Preschool e-Book!

Follow the Hooligans on Facebook

Jackie is a mom, wife, home daycare provider, and the creative spirit behind Happy Hooligans. She specializes in kids’ crafts and activities, easy recipes, and parenting. She began blogging in 2011, and today, Happy Hooligans inspires more than 2 million parents, caregivers and Early Years Professionals all over the globe.


Barbara Street
Love the colors!! I made mine with liquid watercolors from Discount School Supply. You don’t need alcohol or vinegar when using them. I used a large ziploc bag. Put the rice in, squeeze in the watercolors, squish it all around, then dump onto newspaper. I was able to use the same gallon bag for all the colors. Love seeing different ways to try things. Thanks for sharing!!
Christine Allen
I color my rice and pasta the same way. Fastest way to do it and it dries quick.
Lisa
I use liquid food color and nothing else. Just put it in a bowl and mix well with a spoon. It works great. Also: Try using wild rice. You get a variety of colors mixed on the darker grains of rice.
Jessi
Ooo…I like this as an alternative! Lovely!!
happyhooligans
Thanks, Ms. Jessi! 🙂
Sarah Mankelow
This is so cool – I’m going to share it with my daughter’s preschool if that’s OK. I also like the painting with ice idea!
happyhooligans
Absolutely, Sarah! Please share!! Glad you liked the ice-painting too! Thanks so much. 🙂
Kathleen Veronica Yeh
LOVE! I just mentioned colored rice on a post this week…I’m featuring this at Thrifty Thursday this week since I have actually never made it! 😀
happyhooligans
Thank you! You really have to try it! It was so easy to make! ANd it’s SO pretty! Even when it’s all mixed up!
Cristi
I want to do this for ME! But my sproutlets will love it too 🙂
happyhooligans
Absolutely! Pin away!!
Jessica
I love how the colors came out, they’re amazing! I just started teaching preschool 3 years ago and in my new classroom I do not have a sensory box but you’re idea is genius, love it! Thanks so much for sharing! Have a great weekend!!!!! 🙂
happyhooligans
I”m so glad we’ve inspired you to do a sensory box for your classroom, Jessica! Your little people will love it!
Childsplay Daycare
Wonderful results … love that you are using vinegar instead. We’ll do the same! 🙂
Shirin
GREAT!!! Just tried it and we all loved it. We tried this before with rubbing alcohol in ziploc bags. This is way better and less mess and stink. I need to make a post about this and credit you for the lovey idea. Thanks, Jackie.
happyhooligans
I’m glad you had fun with it, Shirin. I love how easy and mess-free it is when you make it this way. Can’t wait to see what you create!
kewkew
You know, I used vinegar while dyeing noodles and I found we didn’t like it, we much preferred the rubbing alcohol because the colors were more vivid. Also, when using vinegar with the noodles we found they became very brittle, which did not happen with the rubbing alcohol.
Your rice, on the other hand looks quite vivid and we wouldn’t have to worry about rice becoming brittle. I will have to try this with rice. Thanks
happyhooligans
How interesting. We didn’t have a problem with our pasta becoming brittle when used vinegar in the dyeing process. In any case, the vinegar is a fine alternative for those who have concerns about using the alcohol when working with little ones. Thanks for your feedback.
Lindsay Woods
I’m trying this tonight with black icing colour to make a sensory bin for Halloween – I can’t wait to see the results 🙂
happyhooligans
How wonderfully spooky Lindsay! Have fun. 🙂
yasmine
This is super brilliant and it looks amazing!!! love it and thanks a million for the great tips ! keep up the good work!
Annie
Have you ever tried using this technique to dye white beans? I tried gel food coloring and rubbing alcohol and my beans are still sticky and color comes off on our hands its been about 5 days and still like that. Wondering if the gel color was the problem. Ever have this problem? Tips?
happyhooligans
No, I’ve only used this process to dye rice and pasta, Annie. I know others have used it to successfully dye corn kernels, but I’ve not heard of anyone dyeing beans. Sorry. It’s the gel that I use to dye my rice and pasta, and I’ve never had a problem when working with those materials, but maybe the beans just don’t absorb it well. Sorry I can’t be of more help.
annie
Thanks! That’s what I was thinking… I read on another blog somewhere that the gel food coloring and rubbing alcohol don’t mix well. Maybe that was my problem. Looking forward to trying out rice and pasta next! Thanks again for your post and feedback!
Jessica Mitchell
I just did the rice coloring project with my 4-year-old, and it was great. So easy! LOVE your blog and SPIRIT.
meia
is it okay not to put vinegar? what does the vinegar help with? i was just wondering is there a substitute for it?
happyhooligans
I use the vinegar as a substitute for rubbing alcohol. I’ve read that some people use hand sanitizer, and I’ve heard that some don’t bother adding anything to set the colour, but you might run into the colour coming off on your hands. I can’t guarantee whether you will or not, but I add the vinegar so it doesn’t happen to us.
Phil O'brien
I also once used such technique, it looks quite attractive and moreover u can reuse it if used carefully.
olgasek
Love it and did it yesterday! One question: what about dyeing rice with liquid watercolors? I saw you used watercolors when dyeing pasta, why not rice?
happyhooligans
You can use either, Olgasek. I know lots of people who use liquid watercolours to dye their pasta and their rice.
clare matthews
Hi
Do you no how to get rid of the vinegar smell when you have coloured the rice
Thank you
happyhooligans
For us, it’s always dissipated as the rice has dried, Clare.
Lisha
Love this idea! But is it really necessary to add the vinegar? I’ve tried making rainbow rice with only liquid food colouring and they turn out great…what exactly does the vinegar do?
Cindy Saffron
I always dry my pasta and rice in a big bowl using a hair dryer. It dries within 3 minutes and can be used immediately.
happyhooligans
That’s brilliant, Cindy! I use my hairdryer to dry our art projects all the time, but I’d never thought of using it to dry our rice! Thanks for the great suggestion!
Tonya Hodges
We used mason jars to shakeup the rice and it worked perfectly and no waste 🙂
Emma Sethi
I never know what a cup is. What’s the ik equivalent? Thanks 🙂
Emma Sethi
I never know what a cup is. What’s the uk equivalent? Thanks 🙂
happyhooligans
There are lots of sites that will allow you to convert measurements, Emma. If you google “measurement conversions”, it should pull a few up. I’m not sure if this helps, but our “cup” is 8 ounces.
sophia
Hi… I used your recipe today & all worked out well…my kids loved the rainbow rice. Though I must ask… how do you store it? The last time I made rainbow rice [with rubbing alcohol] the rice got critters after about two weeks. Has this ever happened to you…?
happyhooligans
We’ve ever had a problem with “critters”, and we’ve stored our rice for over a year now. The only way I can think that critters would get in is if it’s not sealed in an air tight container. We keep ours in a large mason jar with a tight-fitting lid or in a sealed freezer bag.
Tina
I love your ideas! So creative! Just wondering if it’s a specific type of vinegar or just the stuff you would splash on your chips?? Thanks!
happyhooligans
Yes, just regular white vinegar, Tina.
Kendra
Could you use a diff vinegar if you don’t have white
Jackie Currie
I imagine any white, clear vinegar would work, Kendra.
Nida
Thank you so so much for posting this. I tried these out and they were great. They look super as they’re drying out right now. I didn’t imagine I could make something like this, especially since all the creative genes are in my sister. Hopefully my almost 2 year old will play with it, he was super excited while we made it together though 🙂
I made mine with regular liquid colours from Carrefour supermarket in Dubai and used take out containers to do the mixing. Drying out the rice is no problem at all thanks to the hot weather. The foam plates were a great plus.
Enjoyed it 🙂
Charlotte
I’ve been saving all of my scent booster containers and just used those to make red, yellow, green, blue, and purple rice – I used 2 cups of rice each since I have so many little ones. I need more dye to make orange so I’m heading out. I love how excited my kids got while they made this super easy project. Tomorrow, I will use watercolor paper and draw some simple things they like, such as a boat, a house, doll, etc., and then use glue and let them have at it with the colors…should be interesting. lol We’ll see how it goes. Either way, this is such a cute idea for my 6, 3, and 2-year-old! Thank you!!!
**side note** Wish I had used alcohol (which I have on hand, too, but went with vinegar since it was in the kitchen) because this stuff is stinky poopoo!! lol
Colleen
Thank you so much for sharing this! I’ve mentioned this activity in my blog post about super fun ways to keep the kids busy this weekend.
Melissa
Your instructions for rainbow play rice are wonderful! I just tried it for the first time and it worked so well! My 2 year old son had a blast helping me make the rice and the kids will just love playing with it! It’s the perfect sensory activity! Thanks so much for this great post!
happyhooligans
Yay! So glad you and your son loved the recipe. Isn’t it easy?!
Bo Patterson
HELP!!! I colored rice with alcohol and blue food coloring, spread it out on a pan and it has been setting to dry for over two weeks. The blue color is still coming off on my hands. Is there anything I can do to save it?
happyhooligans
That’s so strange, Bo. I’ve never had a problem with the colour coming off on my hands, even when we don’t use alcohol or vinegar to set it. I wonder if you used too much colour. You could try baking it in the oven on your lowest heat setting to see if that sets it.
Cathryn
Thank you so much for this post. It worked beautifully, dried so quickly and the kids had so much fun with their rainbow rice!!
Jackie Currie
You’re welcome, Cathryn! So glad your kids are enjoying it!
Eriana
Hi! I did this and we love the rice! One of the colors leaves behind a tingle of red. It is very dry, but doesn’t pass my squish/roll/squeeze test like the others. Any advice on getting it to set?
happyhooligans
I’m not sure I understand this post appearing on your site. It’s a Buzzfeed post, but it looks like it’s been copied and pasted into your site? That’s a breach of copyright, unless of course, you’re affiliated with Buzzfeed, and have permission to repost their posts in whole this way. If so, please forgive my ignorance.