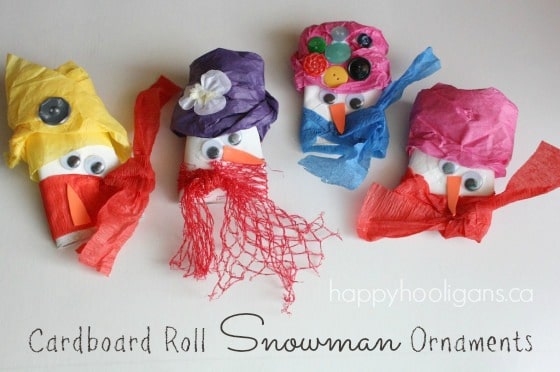
Cardboard Roll Snowman Ornaments – an easy and adorable Christmas craft for kids
What is it about homemade snowman ornaments? They’re so darn cute! It doesn’t matter how you make ’em, they always end up looking just adorable. Check out our CD Snowman Ornaments, Snowman Activity Tray and our toilet roll Snow People for a big dose of snowman cuteness.
What you’ll need to make your snowman ornaments:

- toilet rolls
- white paint/glue/staper
- tissue paper (a long strip for the hat)
- crepe paper or a mesh produce bag (scarf)
- googly eyes
- orange craft foam or construction paper for nose
- buttons, beads or artificial flowers for embellishments on hat
- hole punch/thread for hanging
Developing fine-motor skills:
The hooligans got to work on a couple of new skills with this craft: stapling and tying a knot. The stapler instantly became the most popular tool in the craft room, and dozens of pieces of paper were stapled together throughout the remainder of the day. 🙂
How to make your snowman ornaments:
We started by stapling one end of the toilet roll together. This requires real strength when you’re a toddler. Some children required assistance, and some mastered the technique right away.

Because one end of the tube is stapled shut, you could drop a candy cane or some other little treat down into the top of your ornament when it’s finished.
The next step was to paint the toilet rolls white. The cardboard was already white, but I thought they needed a little spiffing up.

When the paint was dry (a hair dryer speeds this process up), I cut a long strip of tissue paper to measure approx. 6 x 20 inches. This would become the “hat”. Fold the strip in half a time or two, and grab the stapler again, and attach the strip to the top of the snowman’s head. Have your little one can wrap the length of tissue paper around the tube a couple of times, and staple it in place.
Now it’s time for the scarf. We used crepe paper for some, and vegetable netting for others, but you can use whatever you have on hand: fleece, fabric, wide ribbon etc. Heck, you could even cut a strip from a colourful plastic bag. Honestly, when we’re crafting, we use whatever we have.
With the scarf, we placed the toilet roll on top of a strip of crepe paper, and as I held the roll in place, I talked them through the process of tying a knot. It was tricky for sure, and I had to extend a finger here and there to help them along, but for the most part, they were able to tie their scarves with little assistance. When it came to tightening the knots, I emphasized that they’d have to pull gently because the crepe paper was fairly delicate.
Once the scarves were in place, the hooligans glued on the eyes and noses. (love this little upside-down nose!) and they finished up with a button (or several) on their snowman’s hat.
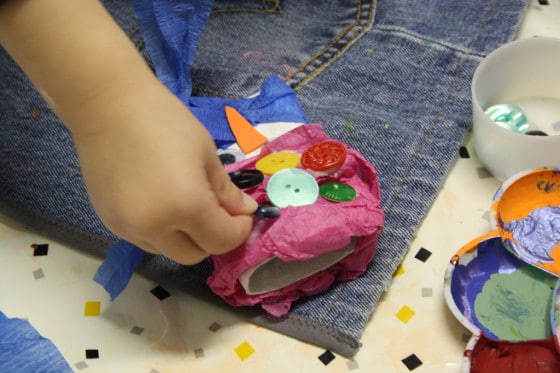
Punch a couple of holes in the sides of the hat, and attach a thread for hanging.
Honestly. Could they be any cuter?

You may also like:
25 {Irresistibly Adorable} Snowman Crafts, Activities and Treats
30+ Toilet Paper Roll Crafts and Activities
12 Easy Christmas Crafts for Kids
Follow the Hooligans on Facebook

Jackie is a mom, wife, home daycare provider, and the creative spirit behind Happy Hooligans. She specializes in kids’ crafts and activities, easy recipes, and parenting. She began blogging in 2011, and today, Happy Hooligans inspires more than 2 million parents, caregivers and Early Years Professionals all over the globe.


Anna Erla
these are the cutest snowmen I have ever seen.
happyhooligans
Thanks, Anna! I never really know what a craft will look like until we actually do, and when these were finished, I was thinking the same thing you were! 🙂
Inese Boki�a
Thanks for idea! That we will realise on January!:)
happyhooligans
You’re welcome, Inese! Have fun with them!
Simona
The snowmen are very funny!
Cari
These are just too cute! I love the scarfs too. As I type this I see in your side bar the most adorable little owls made from the same type of materials. I’ve been saving these rolls for some time just knowing that there would be a fun craft project to do with my kids. Thanks for inspiring me.
Cari @ Reach For The Star Berries
Reach For The Star Berries
happyhooligans
You’re so welcome, Cari! One of the greatest compliments I could ever ask for is to hear that others are inspired by what we do, and are trying our projects at home. So thank you for letting me know, and thanks for following along. 🙂